Be patient..... we are fetching your source code.
Objective
Main objective of this blog post is to give basic information to implement nextpeer for multiplayer game in unity.
Want to implement multiplayer mode in your game?
It's easy to add multiplayer feature using Nextpeer SDK. This post will help you understand the basics about how to integrate nextpeer with unity. Here, we are doing it for android. So let's begin.
Step 1 Nextpeer setup
- First, you need nextpeer SDK plug-in for unity. You can download it from here (https://www.nextpeer.com). Now import this to your unity project.
- You must have an account in nextpeer in order to access its facilities.
- After creating the account, you have to add your game in it.
- Therein, you will find setting panel where you have to give the basic information about your game like name, package name etc. You don't have to worry about Google play URL or icon. You can fill it after your game is published.
- You will find a game key which is unique for your game so that nextpeer can recognize your game easily.
- Next panel is for Tournament. In which you have to add tournament which shows up when player tries to connect with nextpeer board. Set Game Type which is synchronize or asynchronies depending on your game.
- Asynchronies mean player does not require a live connection. Where in synchronized player have to live in an order to play.
- At last don't forget to activate the tournament. You can do this by activating the tournament status.
- In Advance setting panel, you have to specify about the number of players who can play.
- So that's it! Basic setup for nextpeer is done. You don't have to worry about the other stuff.
Step 2 Unity setup
- You can read stuff related to integrating nextpeer with unity in nextpeer website. It’s an easy stuff when it comes to understanding but really little tough when it comes to implementing.
- So I have created a script called "NextpeerManager.cs". It will do all the steps which are explained in the website.
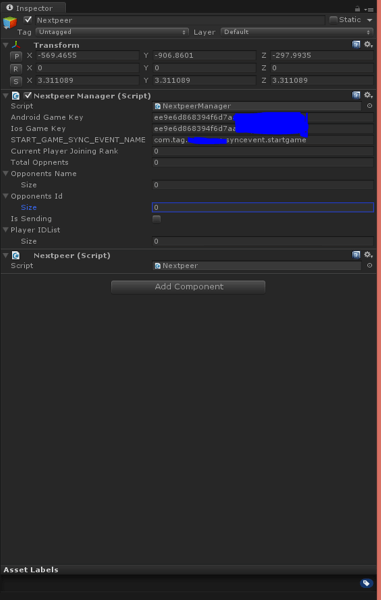
- You have to make one empty game object and apply this script to it. You also have to give nextpeer.cs file to this game object which you’ll find under Assets>Plugin>Nextpeer>Nextpeer.cs.
- Now, in nextpeer game object you will be able to see android game key and ios game key which appears when you have added game in nextpeer on the website. Right now we only have android so we can only add the android key in it.
- START_GAME_SYNC_EVENT_NAME = com.name.yourgame.syncevent.startgame
The synchronized event name with which the clients will register cannot be empty or null.

- Now you just have to call "LaunchDashboard()" method and it will bring nextpeer dashboard to you. You can see your tournament name there but right now we don't have any game so it will not do anything.
- You can find all the other stuffs like how to start the tournament or how to send the data or how to post scores in nextpeermanager.cs file.
- Nextpeer allows you to send data in byte so you need not convert your data to byte. For that I have created function which takes string data and converts it to byte as well takes byte data and converts it to string data, which you will find in nextpeermanager.cs file.
Done!! This is a simple implementation of nextpeer. In next post we will see the demo of Turn Based game in which players’ turn will change and that player can also send data to another player.
I hope you find this post very helpful while Implementing Nextpeer for Multiplayer Game. Let me know in comment if you have any questions regarding unity. I will reply you ASAP.
Got an idea of unity game development what are you still waiting for? Contact us now and see the idea live soon. Our company has been named as one of the best game development company in India.

I am professional game developer, developing games in unity (for all platforms). I am very passionate about game development and aim to create addictive, interactive, high quality games.
Game Main Menu Design
