Be patient..... we are fetching your source code.
Objective
iOS 9 has introduced a new framework for contacts, it's called “Contacts Framework”. In this post, I would be focusing on how to do following operations on contacts.
- Create Contacts
- Fetch Contacts
- Update Contacts
I would be using Contacts framework of iOS 9 as a replacement of AddressBook framework from the previous versions iOS.
Introduction:
Apple has introduced new Contacts Framework in iOS 9, which replaces the AddressBook framework. Accessing contacts information using AddressBook framework was very complicated task for developer. But new "Contacts framework of iOS 9 provides very easy API to access Contact information. Contacts Framework provides contacts not only from database of device but also from various sources like iCloud account and then return the associated contacts to the user. We can also search and filter the contacts using this Contacts Framework."
Step 1 Create Layouts
1.1 Create New Project
Create new Xcode swift project named "ContactsFrameworkSwift".
If you don’t know basic steps to create project in xCode, please refer following link:
In my demo example, I have explained:
- How to fetch all Contacts.
- Add New Contact and
- Update existing contact using Contacts Framework.
I have also explained new feature of Contacts framework to search the contact using NSPredicate.
1.2 Create Layouts
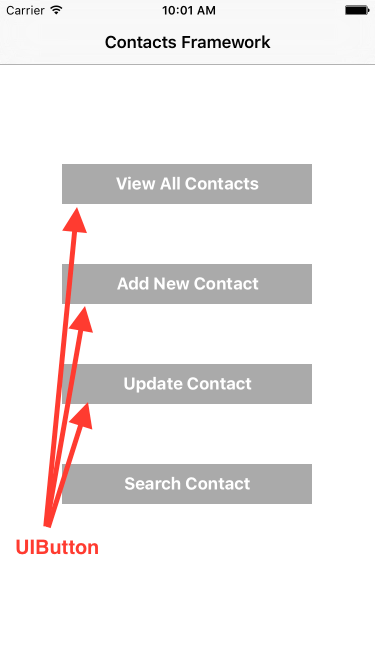
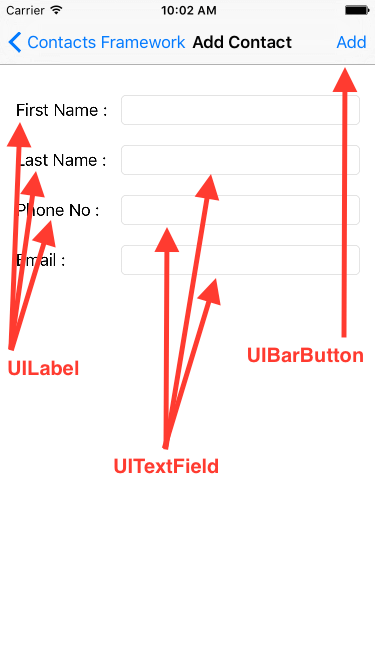
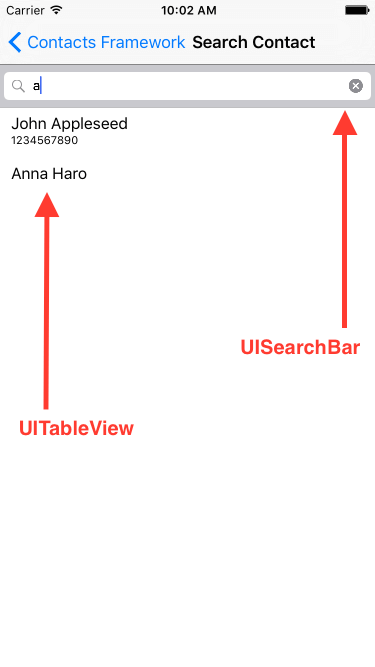
We will need to create layouts which will enable us to do add, edit, view and search contacts data.
To create our layouts, we will need to use following controls from object library.
- UIButton
- UIBarButton
- UILabel
- UITextField
- UISearchBar
- UITableView
If you are not familiar with the user interface then please refer below link:
1.3 Set up Classes
Now we need to create swift files for the layouts.
a. In this example we need to create three swift files named:
| ContactsViewController.swift | From which can select option. |
| AddUpdateContactViewController.swift | From which can Add or Update Contact data. |
| SearchContactViewController.swift | From which can search Contact data |
b. Now to connect this swift files with layout, open Storyboard and then from Identity Inspector set classes accordingly as shown in the figure given below:

c. Now to open Add/ Update and Search Contact view we need to create segue from storyboard:
- OpenAddContactView (ContactsViewController to AddUpdateContactViewController)
- OpenUpdateContactView (ContactsViewController to AddUpdateContactViewController)
- OpenSearchView (ContactsViewController to SearchContactViewController)
Step 2 Add/ Update/ View Contact Data
2.1 Request to Access Contact Data
When we working with the Contacts Framework for first time, we need to get authority to access Contacts Data. Using below method we will send request to authorize application to access Contact Data.
func askForContactAccess() {
        let authorizationStatus = CNContactStore.authorizationStatusForEntityType(CNEntityType.Contacts)

        switch authorizationStatus {
        case .Denied, .NotDetermined:
            self.contactStore.requestAccessForEntityType(CNEntityType.Contacts, completionHandler: { (access, accessError) -> Void in
                if !access {
                    if authorizationStatus == CNAuthorizationStatus.Denied {
                        dispatch_async(dispatch_get_main_queue(), { () -> Void in
                            let message = "\(accessError!.localizedDescription)\n\nPlease allow the app to access your contacts through the Settings."
                            let alertController = UIAlertController(title: "Contacts", message: message, preferredStyle: UIAlertControllerStyle.Alert)

                            let dismissAction = UIAlertAction(title: "OK", style: UIAlertActionStyle.Default) { (action) -> Void in
                            }

                            alertController.addAction(dismissAction)

                            self.presentViewController(alertController, animated: true, completion: nil)
                        })
                    }
                }
            })
            break
        default:
            break
        }
    }
Here ContactStore return status as CNAuthorizationStatus, which contains four values as described below:
- Authorized: We can access the Contacts data and can perform operation on contact data.
- NotDetermined: We can’t access the Contacts data and also can’t perform any operation.
- Denied: If user press doesn’t allow in alert then user has the status value as Denied. User can change this status from settings later.
- Restricted: We can’t access the Contacts data and also can’t perform any operation. Also for this status user can’t change the status from settings as restriction is activated from other control.
2.2 View Contacts Data
Contacts Framework provides CNContactPickerViewController class to display contacts. If you use the function given below, it would look like the default Contacts Application.
Also we can specify to fetch particular contact using contactPickerViewController.predicateForEnablingContact
@IBAction func btnViewAllContactsClicked(sender: AnyObject) {
       let contactPickerViewController = CNContactPickerViewController()
       presentViewController(contactPickerViewController, animated: true, completion: nil
}
2.3 Add / Update Contact Data
To create new contact we need to create object of CNMutableContact and set all the values of contact and then can store this object using ContactStore.
We can also update the Contact by creating CNMutableContact object and then update contact using ContactStore as shown in below function.
@IBAction func btnAddUpdateContactClicked(sender: AnyObject) {

        var newContact = CNMutableContact()

        if isUpdate == true {
            newContact = updateContact.mutableCopy() as! CNMutableContact
        }

        //Set Name
        newContact.givenName = txtFirstName.text!
        newContact.familyName = txtLastName.text!

        //Set Phone No
        let phoneNo = CNLabeledValue(label:CNLabelPhoneNumberMobile, value:CNPhoneNumber(stringValue:txtPhoneNo.text!))

        if isUpdate == true {
            newContact.phoneNumbers.append(phoneNo)
        } else {
            newContact.phoneNumbers = [phoneNo]
        }

        //Set Email
        let homeEmail = CNLabeledValue(label: CNLabelHome, value: txtEmail.text!)

        if isUpdate == true {
            newContact.emailAddresses.append(homeEmail)
        } else {
            newContact.emailAddresses = [homeEmail]
        }

        var message: String = ""

        do {
            let saveRequest = CNSaveRequest()
            if isUpdate == true {
                saveRequest.updateContact(newContact)
                message = "Contact Updated Successfully"
            } else {
                saveRequest.addContact(newContact, toContainerWithIdentifier: nil)
                message = "Contact Added Successfully"
            }

            let contactStore = CNContactStore()
            try contactStore.executeSaveRequest(saveRequest)

            displayAlertMessage(message, isAction: true)
        }
        catch {
            if isUpdate == true {
                message = "Unable to Update the Contact."
            } else {
                message = "Unable to Add the New Contact."
            }

            displayAlertMessage(message, isAction: false)
        }
    }
Step 3 Search Contact Data
3.1 Search Contact Data
In Contacts framework we can search specific contact using NSPredicate. In below example we are searching contact based on matching name. For that we need to create object of NSPredicate with the name you want to search.
let predicate = CNContact.predicateForContactsMatchingName(name)
Also we can set the property, which we want to retrieve from contact data using below line.
let keysToFetch = [CNContactGivenNameKey, CNContactFamilyNameKey, CNContactPhoneNumbersKey, CNContactUrlAddressesKey]
And then using ContactStore object we can search contact data as shown in below function. Here it returns the array CNContact object, which contains all the information related to particular contact.
func searchContactDataBaseOnName(name: String) {
        marrContacts.removeAllObjects()

        let predicate = CNContact.predicateForContactsMatchingName(name)

        //Fetch Contacts Information like givenName and familyName, phoneNo, address
        let keysToFetch = [CNContactGivenNameKey, CNContactFamilyNameKey, CNContactPhoneNumbersKey, CNContactUrlAddressesKey]

        let store = CNContactStore()

        do {
            let contacts = try store.unifiedContactsMatchingPredicate(predicate,
                keysToFetch: keysToFetch)

            for contact in contacts {
                marrContacts.addObject(contact)
            }
            tbContacts.reloadData()
        }
        catch{
            print("Handle the error please")
        }
    }
Now we can display retrieved contact data in tableview using below function.
func tableView(tableView: UITableView, numberOfRowsInSection section: Int) -> Int {
        return marrContacts.count
    }

    func tableView(tableView: UITableView, cellForRowAtIndexPath indexPath: NSIndexPath) -> UITableViewCell {
        let cell = tableView.dequeueReusableCellWithIdentifier("ContactCell")
        let contact = marrContacts.objectAtIndex(indexPath.row) as! CNContact
        cell!.textLabel?.text = "\(contact.givenName) \(contact.familyName)"
        cell!.detailTextLabel?.text = ""
        for phoneNo in contact.phoneNumbers {
            if phoneNo.label == CNLabelPhoneNumberMobile {
                cell!.detailTextLabel?.text = (phoneNo.value as! CNPhoneNumber).stringValue
                break
            }
        }

        return cell!
    }
I hope you will find this post very useful while working with Contact Framework in Swift 2.0. Let me know in comment if you have any questions regarding in Swift. I will reply you ASAP.
Got an Idea of iPhone App Development? What are you still waiting for? Contact us now and see the Idea live soon. Our company has been named as one of the best iPhone App Development Company in India.

Being an iOS developer with experience of 3 years feels pretty awesome because much more than just playing around with code, software developers are the brains behind the design, installation, testing and maintenance of software systems.
Basic of Creating Xcode Project in iOS


