- Final Output
- Create a new document and new layer with black fill color
- Create a new text layer
- Duplicate the background layer
- Create a new mesh from layer(Go to 3D)
- Select all 3D layers and merge it
- Open the 3D panel and properties panel
- Choose one of the 3D Modes
- Select 3D texts and change extrusion depth value
- Change bevel width and contour
- Change the co-ordinates and rotations
- Snap object to ground plane and change the position
- Set inner text and outer text mesh
- Select the current view
- Scale plane mesh untill it covers empty areas
- Work with materials
- Select material of both text mashes in 3D panel and remove the texture
- Change the diffuse color
- Click on bump icon and choose new texture
- Set width and height for texture
- Select Edit texture
- Duplicate the background layer and apply the pattern overlay
- Set the brightness/contrast, levels
- Change the bump value
- Edit UV properties
- Replace the texture of plane material
- Duplicate the background layer and apply color overlay
- Edit UV properties
- Set the specular color, shine, reflection
- Select the light from 3D panel and change color, intensity, shadow softness
- Set the light and co-ordinate value
- Add new point light and change its settings
- Save Camera View
- Click on Environment tab and load the texture by clicking on IBL folder icon
- Render The 3D Scene
Objective
This tutorial will show how to use Photoshop CC Shape Attribute and 3D capabilities to create an elegant royal gold 3D text font effect. It will guide you through modifying the shape settings, working on 3D element, creating different materials, adjusting the lights and modifying the rendered result.
Step 1 Final Ouput

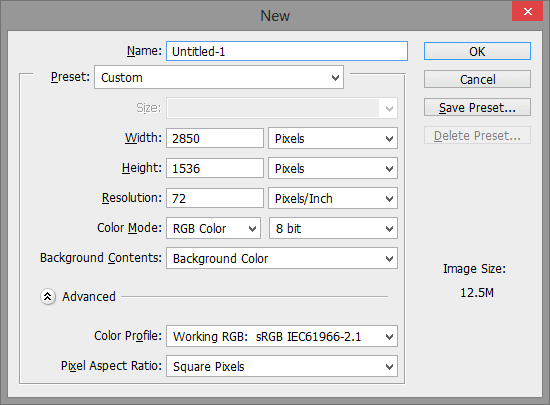
Step 2 Create a New Document and New With Black Fill Color
Create a new 2850 x 1536 px document and fill the Background with Black.
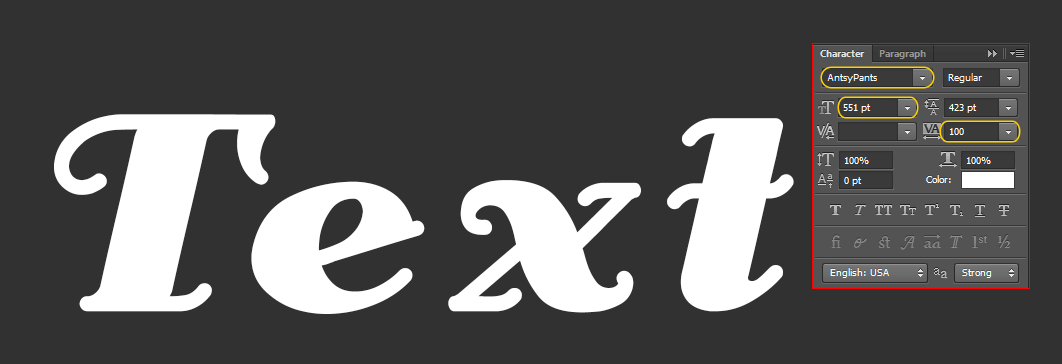
Step 3 Create a New Text Layer
Create the text in White using the font “AntsyPants”, font Size 551 pt and set the Tracking value to 100.
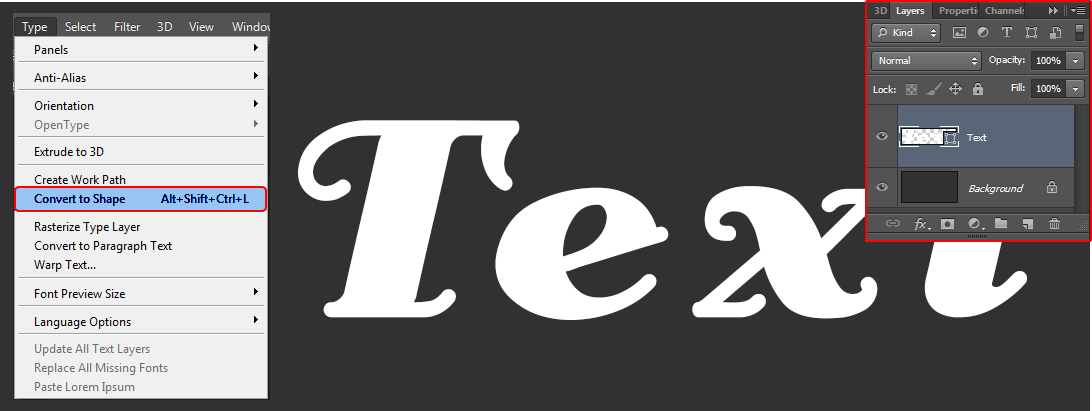
3.1 Convert Text To Shape
Go to Type > Convert to Shape. This will convert the text layer in a shape text layer which means it won’t be editable as text anymore. So make sure to modify the text before you convert its text layer.
3.2 Duplicate a Layer Then Change Fill and Stroke
Duplicate the text shape layer and pick the Direct Selection Tool to get the Shape settings in the Options bar. Change the Fill to none and Stroke color to any gray (#7c7c7c) color, Stroke Size to 15 and Alignment to Outside.
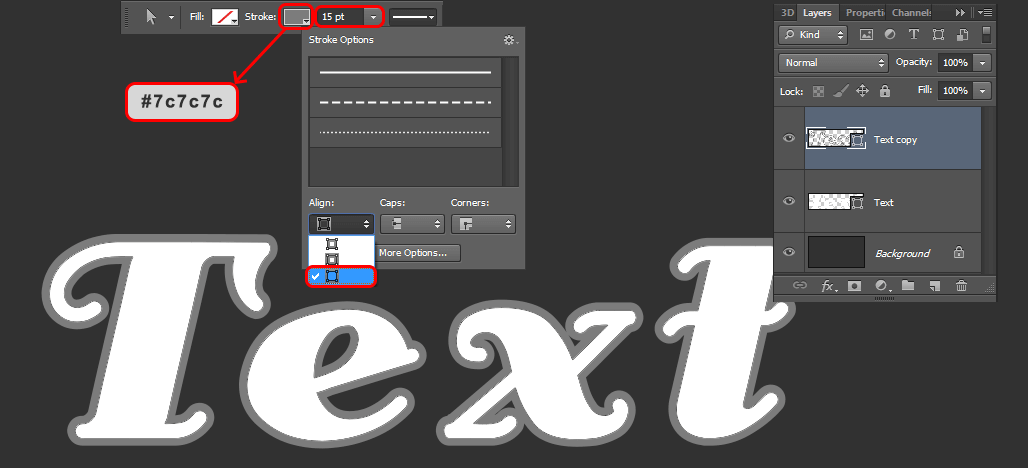
Select each text layer and text copy layer, then go to 3D > New 3D Extrusion from Selected Path, to convert the shape text layers to 3D layer.
Step 4 Duplicate The Background Layer
Duplicate the Background layer and drag the copy on top of all the layers.
Step 5 Create a New Mesh From Layer (Go to 3D)
Go to 3D > New Mesh from Layer > Postcard.
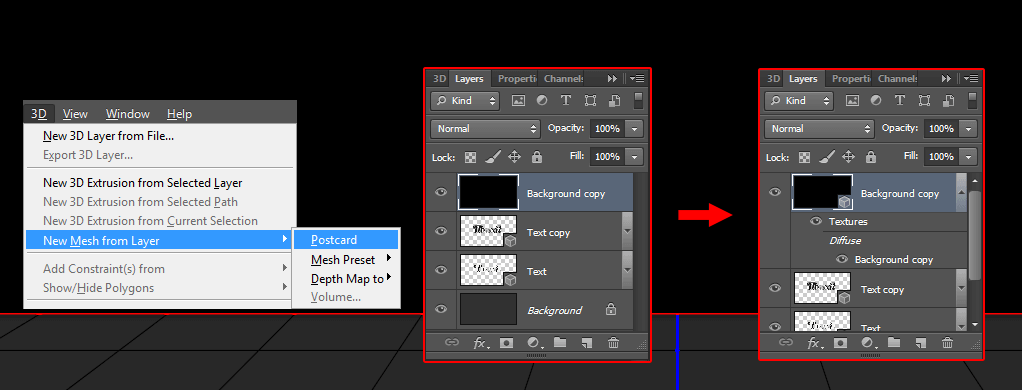
5.1 Select All 3D Layers And Merge It
Select all the 3D layers you have (click the one at the top, press and hold the Shift key, then click the one at the bottom), and go to 3D > Merge 3D Layers.
"This will place all 3D layers in one scene".
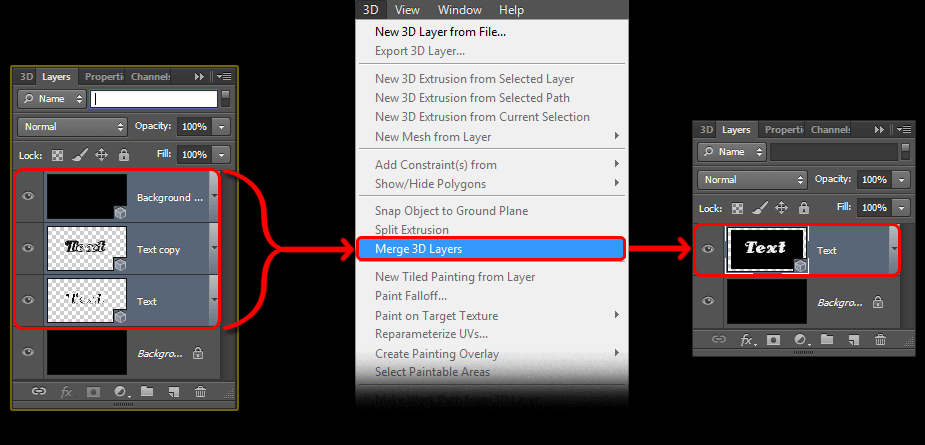
5.2 Open The 3D Panel and Properties Panel
To access the 3D mesh properties and settings, you’ll have to open two panels:
The 3D panel and the Properties panel (both found under the Window menu). The 3D panel has all the components of the 3D text scene and when you click the name of any of those, you’ll be able to access its setting in the Properties panel. So make sure to always select the name of the element you want to modify in the 3D panel before you change its settings in the Properties panel.
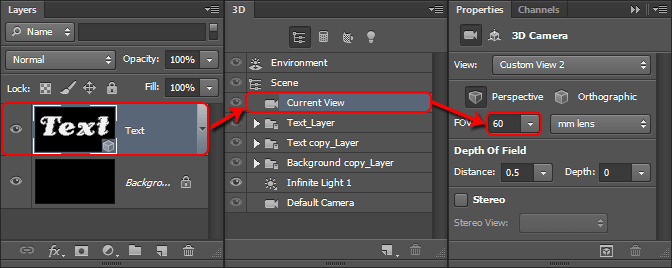
5.3 Choose one of the 3D Modes
Select the Move Tool and check its Option's bar. You’ll find a set of 3D Modes for the tool to the right of the bar. When you choose one of those, you can then click on drag to perform any changes (on the selected element in the 3D panel).
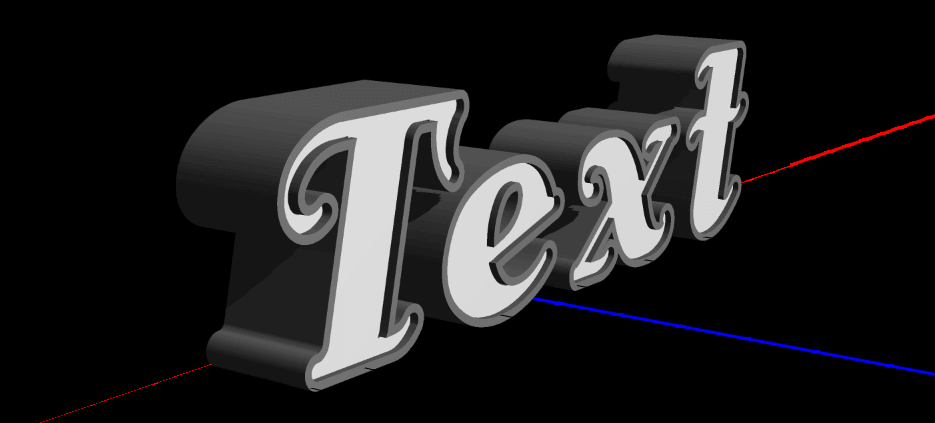
5.4 Select 3D Text and Change Extrusion Depth Value
Select the 3D text shape mesh, name tabs in the 3D panel (select one then Ctrl/Cmd + select other) and change the Extrusion Depth value in the Properties panel to 300.
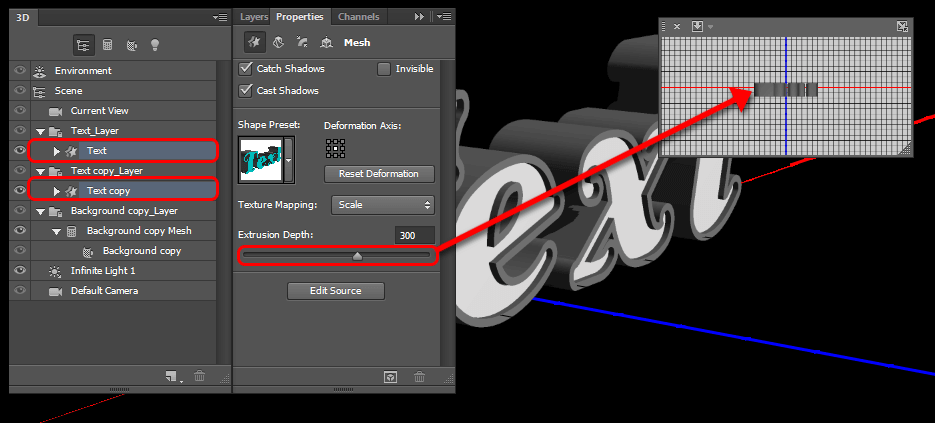
5.5 Change Bevel Width and Contour
Click Cap icon at the top of the Properties panel, and change the Bevel Width to 4 and the Contour to Half Round.
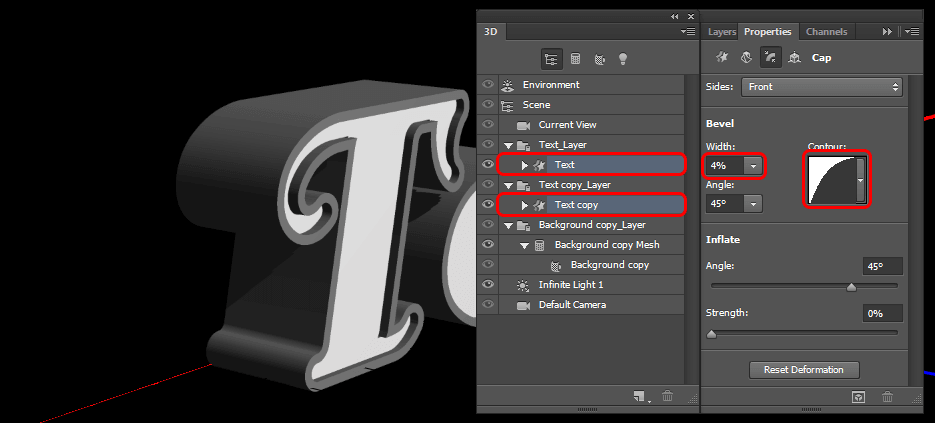
5.6 Change The Co-ordinates and Rotation
Click on the Co-ordinates icon and change the X Rotation angle to 90°. This will make the text meshes perpendicular to the Ground Plane.
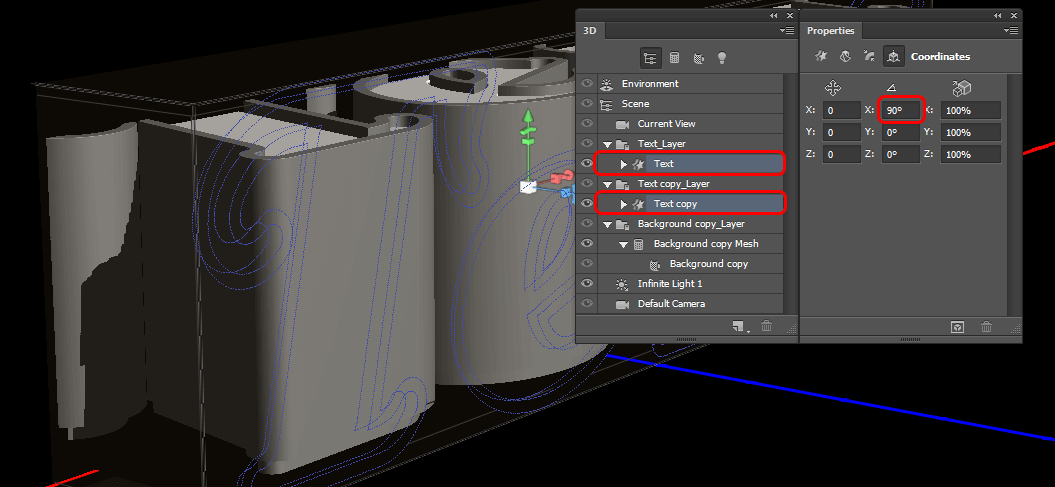
Select a plane mesh name and change its X Rotation Angle to 90° as well.
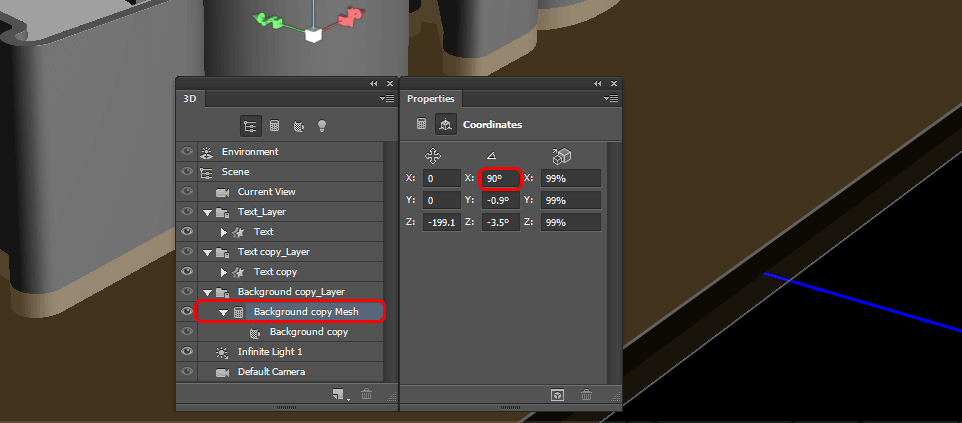
You can fill the text Background Layer with any color other than Black so that it is easier to see the 3D meshes.
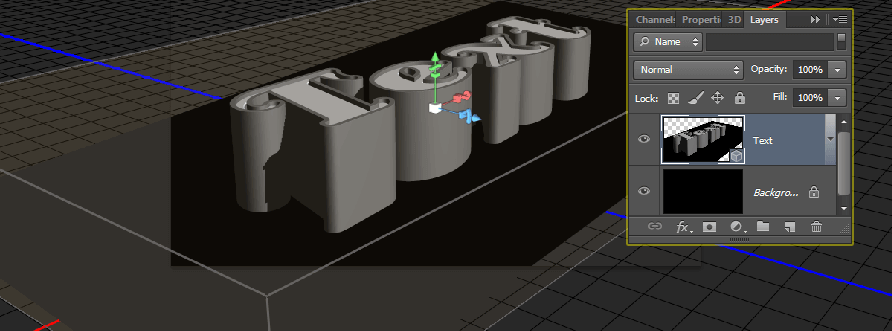
5.7 Snap Object to Ground Plane and Change The Position
Select the 3D layer again and then select the plane mesh name in the 3D panel. Go to 3D > Snap Object to Ground Plane Select, and under Coordinates in the Properties panel, set increase the Y Position value you have by 0.1. Plane is not exactly on the original Ground Plane.
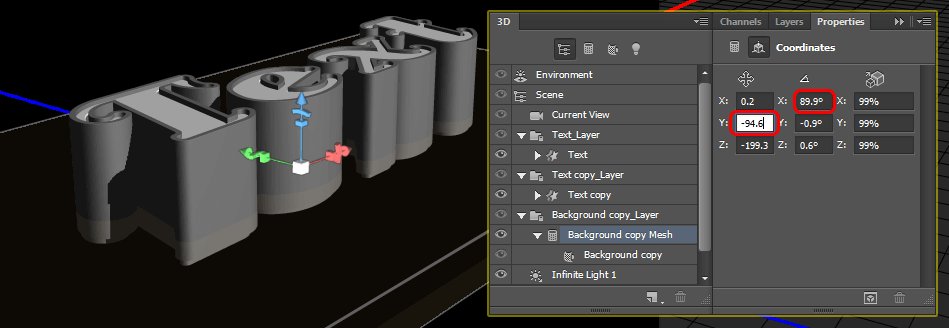
5.8 Set Inner Text and Outer Text Mesh
Select the outer text mesh name in the 3D panel and snap it to the Ground Plane. Then, select the inner text mesh and move it so that it extends a bit outside the stroke.
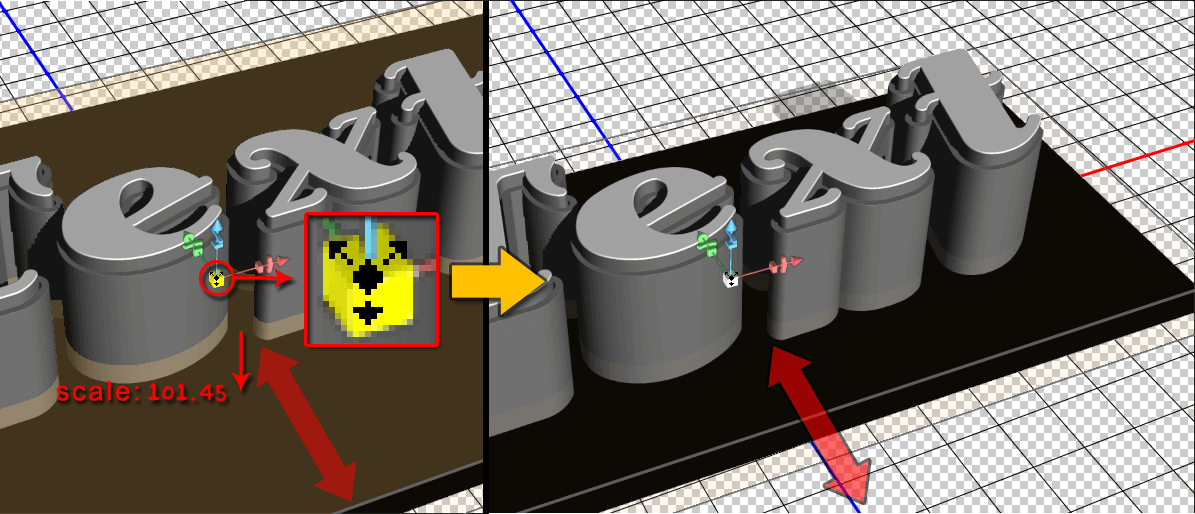
You can do that with the Move Tool selected and using the 3D Axis. The arrows at the ends of the 3D Axis 42.37 move the mesh, the part below them is used for rotation and the cubes are used for scaling on. The cube in the center is used to scale the object uniformly. All you need to do is click and drag the part you need to perform the changes on.
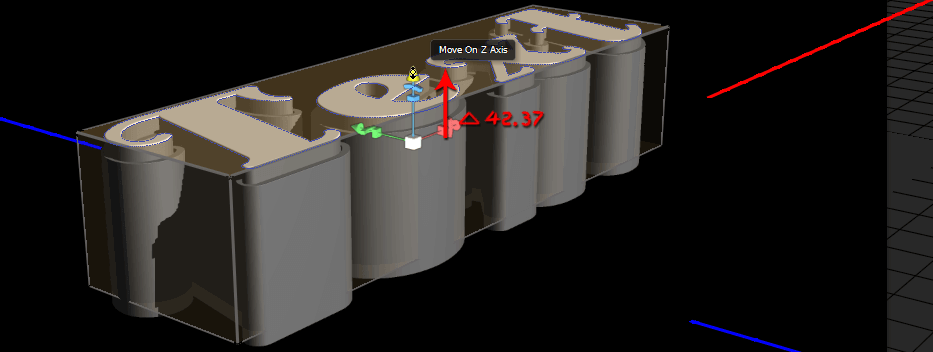
5.9 Select The Current View
When you're done.select the Current View tab in 3D layer panel and use the Move Tool’s 3D Modes to move the scene around until you get a camera view which you like.
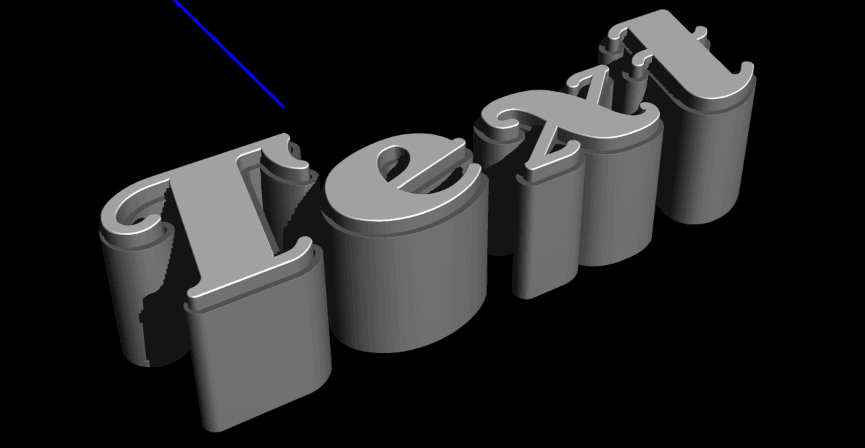
5.10 Scale Plane Mesh Untill it Covers Empty Areas
Selected plane mesh then scale it uniformly until it covers all the empty areas around the text.
Step 6 Work With Materials
Time to work on the materials.
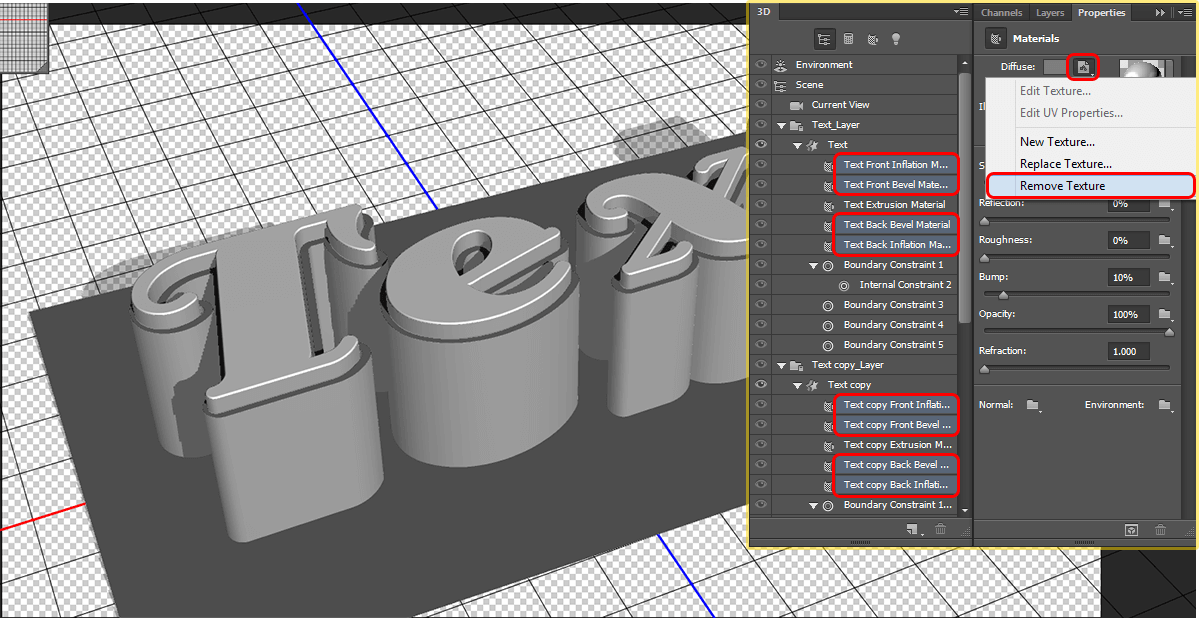
6.1 Select Material of Both Text Mashes in 3D Panel and Remove The Texture
Start by selecting all the material tabs of both text meshes in the 3D panel except for the Extrusion materials (Ctrl \ Cmd + click the tabs to select). Then, in the Properties panel, click on the Diffuse texture icon and choose Remove Texture.
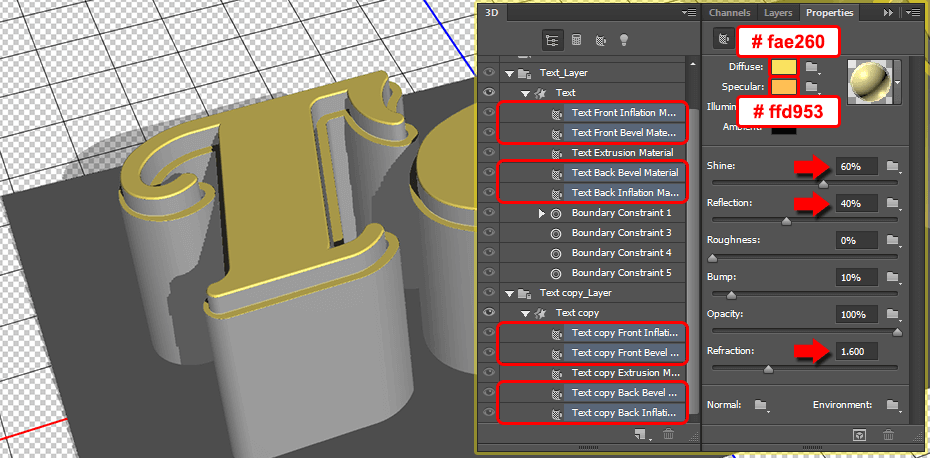
6.2 Change The Diffuse Color
Change the Diffuse color to # fae260, the Specular to # ffd953, the Shine value to 60%, the Reflection to 40%, and the Refraction to 1.600. This will create the shiny gold material.
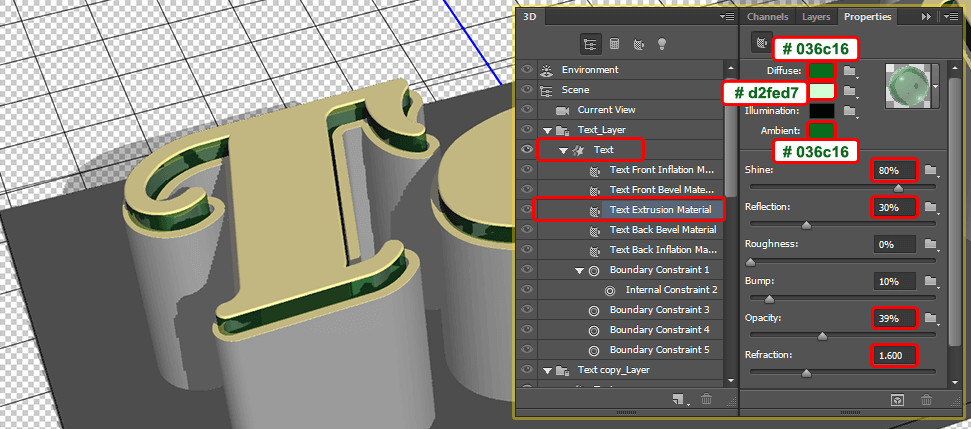
Select the inner text Extrusion material tab, and remove the Diffuse texture, then change the Diffuse color to “# 036c16”, the Specular to “# d2fed7”, the Ambient to “# 036c16”, the Shine value to 80%, the Reflection to 30%, the Opacity to 39%, and the Refraction to 1.600. This will create the glass material.
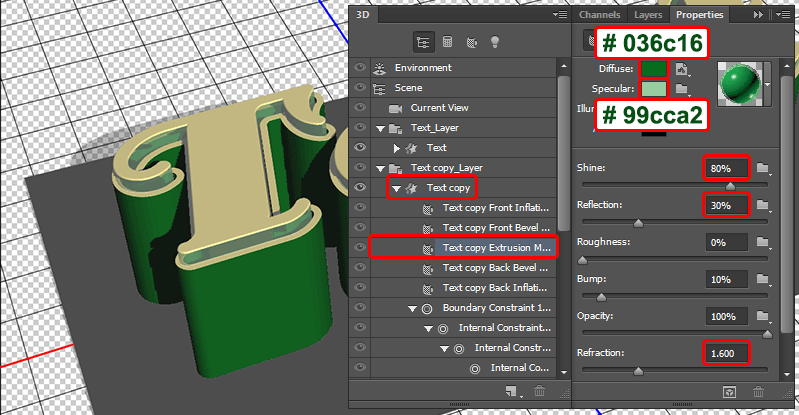
Click on the outer text mesh Extrusion material tab and, remove the Diffuse texture, then change the Diffuse color to “# 036c16”, the Specular to “# 99cca2”, the Shine value to 80%, the Reflection to 30%, and the Refraction to 1.600.
6.3 Click on Bump icon and choose new texture
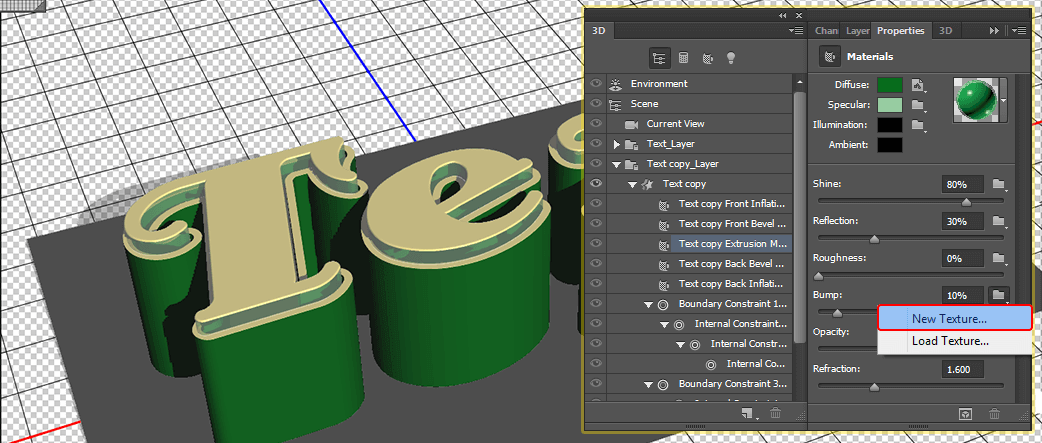
Click on the Bump folder icon and choose New Texture.
6.4 Set Width and Height for Texture
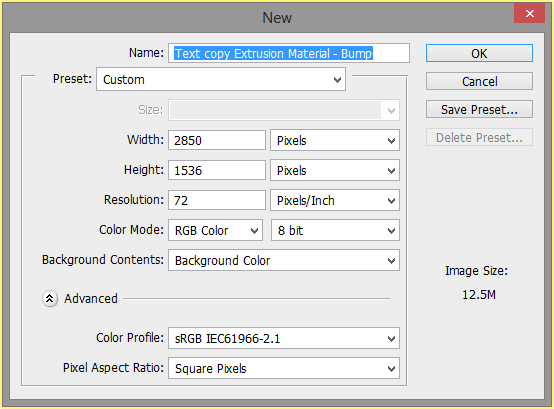
Type in “2850” and “1536” for Width and Height values.
6.5 Select Edit Texture
Click on the Bump icon and choose Edit Texture.
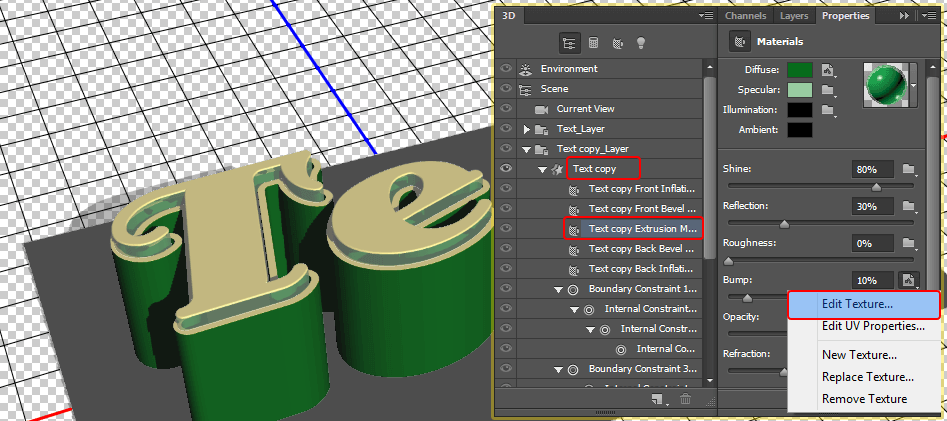
This will open the textures file. Duplicate the Background layer.
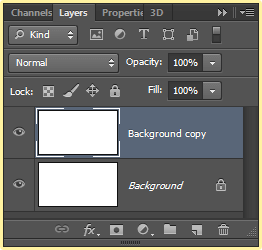
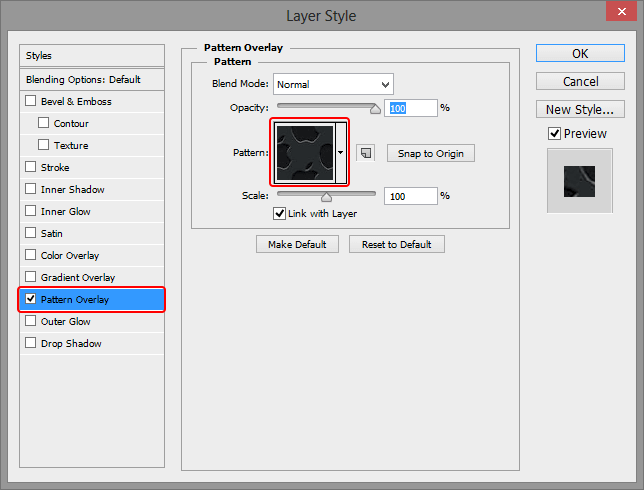
6.6 Duplicate the Background Layer and Apply The Pattern Overly
New Double click on the Background copy layer to apply a Pattern Overlay effect using the “Apple Logo Texture” pattern.
6.7 Set The Brightness / Contrast, Level
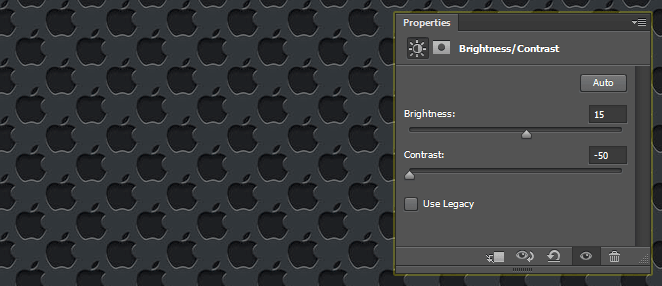
Click on ‘Create new fill or adjustment layer’ icon down the 3D panel and choose Brightness/Contrast.
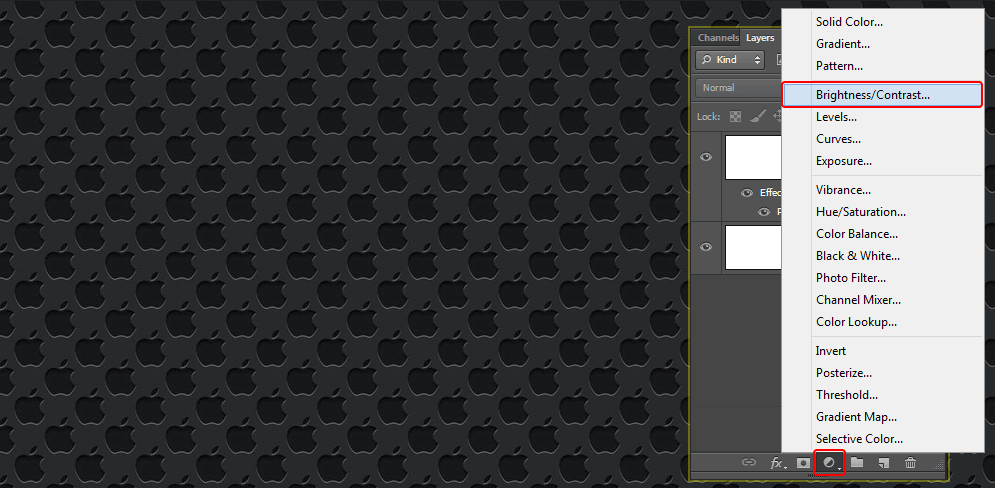
Change Brightness to 15 and Contrast to -50.
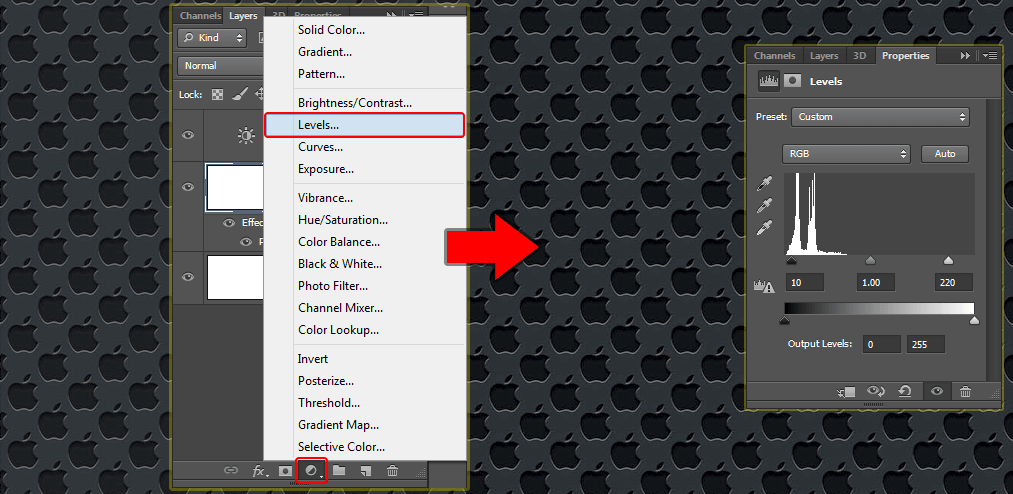
Once again, click on 'Create new fill or adjustment layer' icon, but this time, choose Levels. Change the Shadows value to 10 and the Highlights value to 220. Save the file (file > Save) and close it (File > Close) to go back to the original 3D document.
6.8 Change The Bump Value
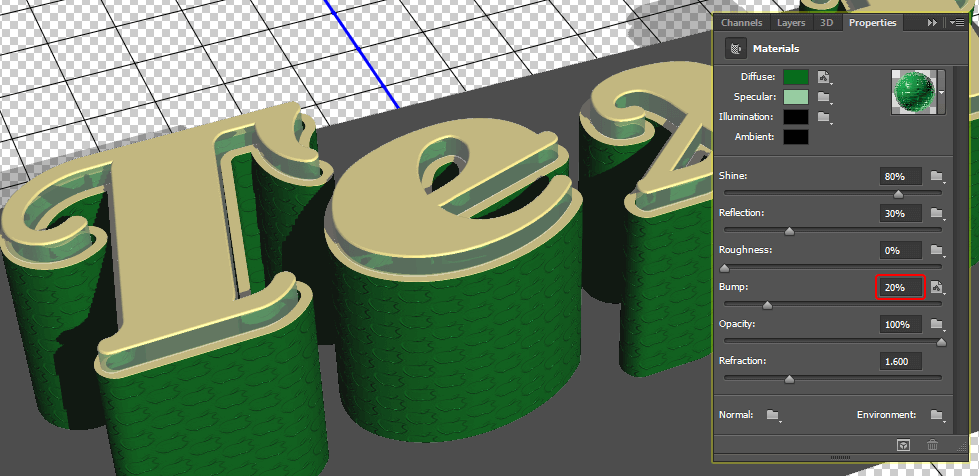
Change the Bump value to 20%. Now you can start seeing the texture clearly. Bump texture creates an illusion of raised areas for the lighter colors in the texture, and more flat ones for the darker colors.
6.9 Edit UV Properties
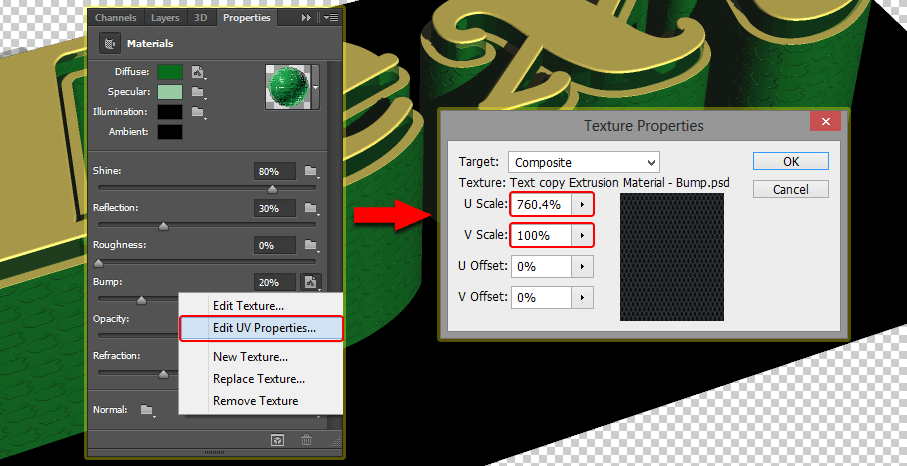
Click on the Bump texture icon and choose Edit UV Properties. Then, change the U Scale to 760.4%, the V Scale to 100% and both the U Offset and V Offset to 0.
6.10 Replace The Texture of Plane Material
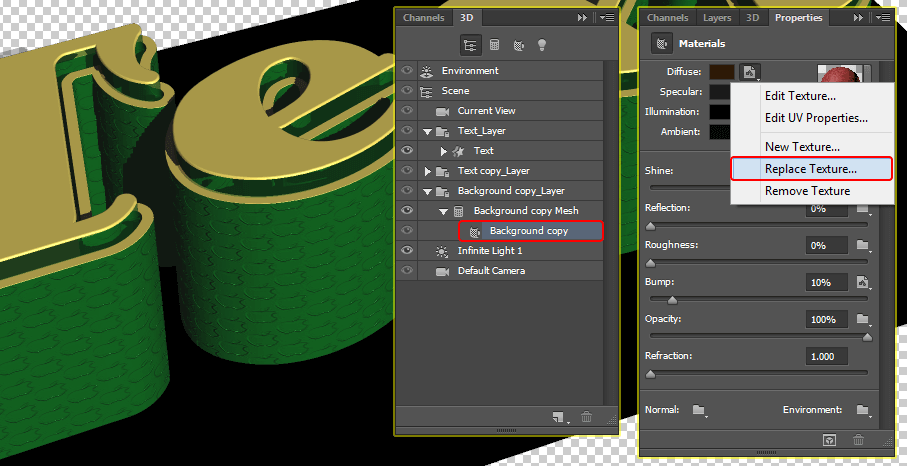
Click on the plane material tab, then click its diffuse texture icon and choose Replace Texture. Load the “flowers-pattern.jpg” image from the “Tile-able Light Flowers pattern Texture's”, and then click on the diffuse texture pack icon again and choose Edit Texture to open its file.
6.11 Duplicate The Background Layer and Apply Color Overlay
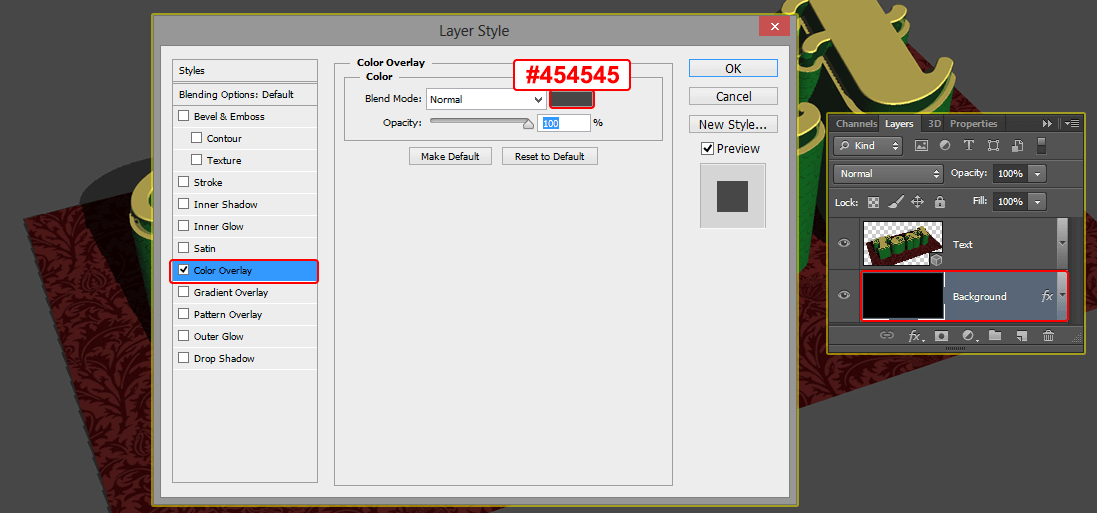
In the texture’s file, duplicate the Background layer and double click the copy to apply a Color Overlay effect. Change the Blend Mode to Multiply and the color to “#454545”.
6.12 Edit UV Properties
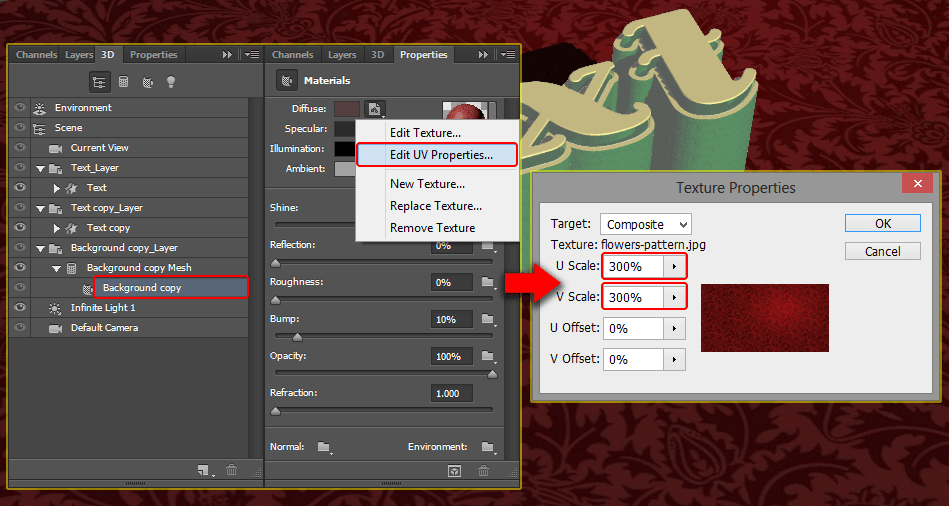
Click the Diffuse texture icon once more and choose Edit UV Properties. Change the U Scale to 300%, the V Scale to 300%, and both the U Offset 0 and V Offset 0. You can use other values if you want to get larger or smaller tiles of Flowers.
6.13 Set The Specular Color, Shine, Reflection
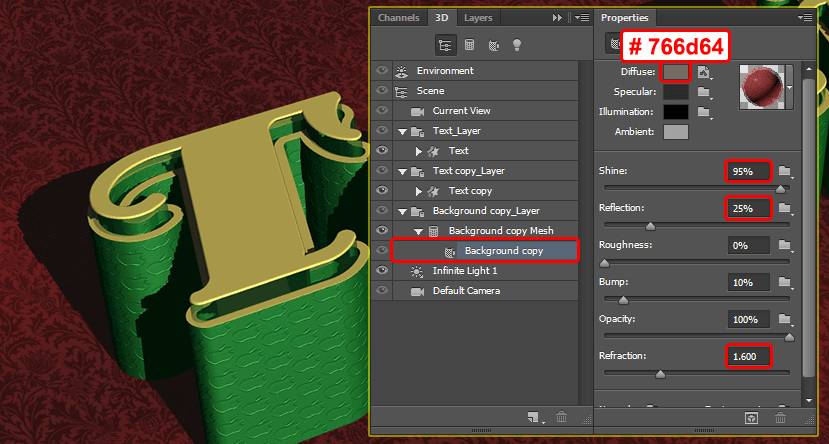
As for the other settings, change the specular color to “# 766d64”, the Shine value to 95%, the Reflection to 25% and remove the Opacity texture.
6.14 Select The Light From 3D Panel and Change Color, Intensity, Shadow Softness
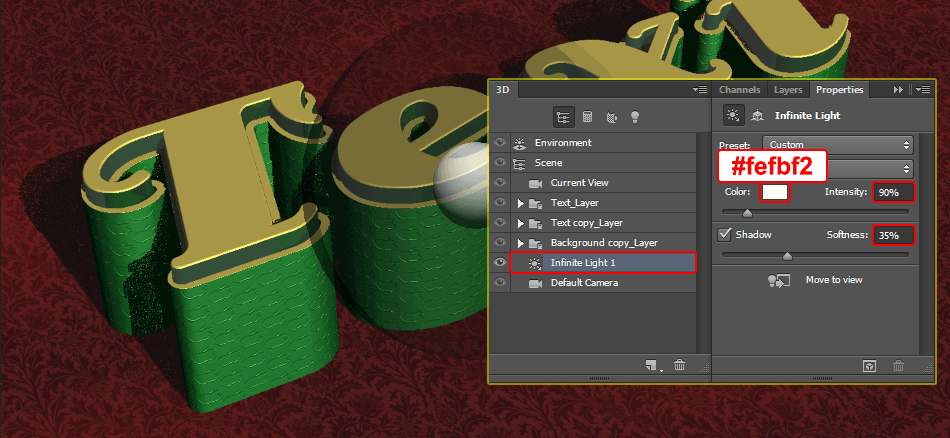
Click the "Infinite Light 1" tab in the 3D panel, then, in the Properties panel, change its color to “#fefbf2”, its Intensity to 90%, and its Shadow Softness to 35%.
6.15 Set The LIght and co-ordinate value
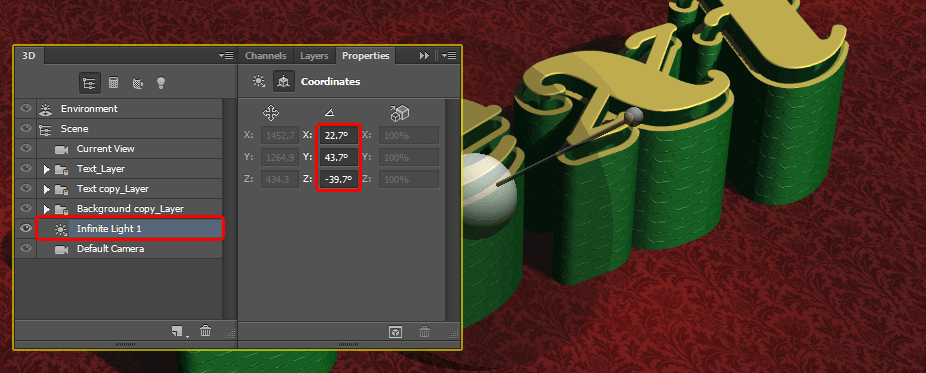
You can then move on the light around until you like how it casts the shadow, or use the same Coordinate's values shown below( X : 22.7°, Y : 43.7° Z : -39.7° ).
6.16 Add New Point Light and Change its Settings
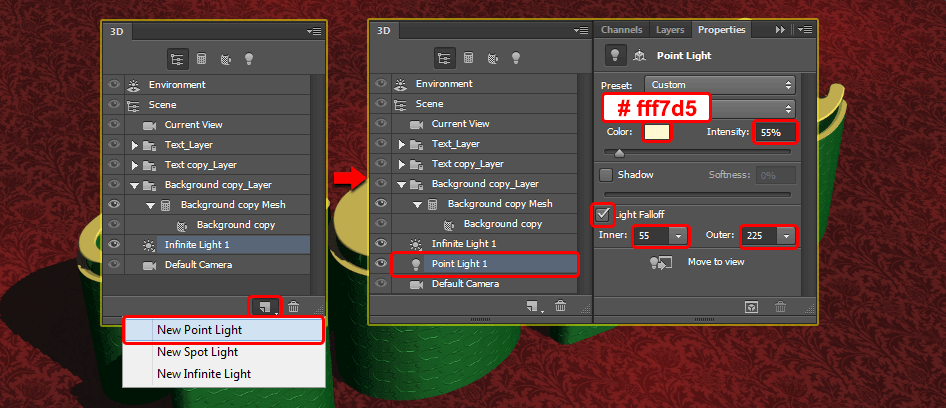
Click on Add new "Light" to Scene icon down the 3D panel, and choose New Point Light.
Change the Point Light’s color to # fff7d5, its Intensity to 55%, and uncheck its Shadow box. Then, check the Light-Fall off box, change the Inner value to 55 and the Outer to 225. This will make the light gradually fade.
6.17 Save Camera View
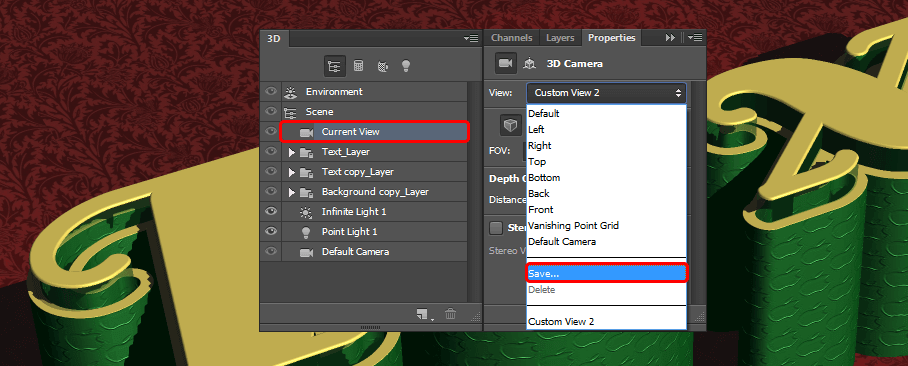
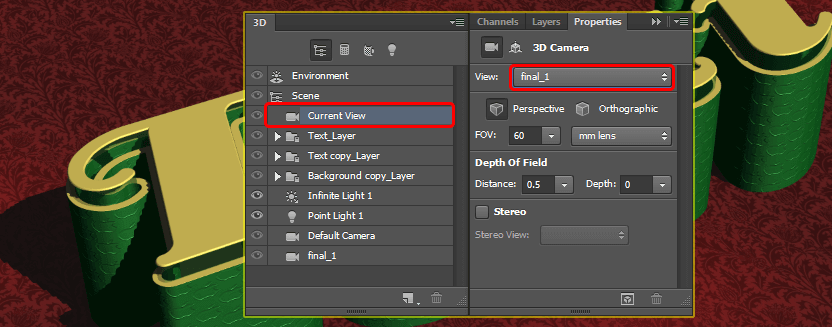
Before you position the "Point Light", it is a good idea to save camera view. To do so, click on the Current View tab, then choose the "Save" option from the View drop down menu in the Properties panel.
Type in a name "Final_1" for viewing it and then click OK.
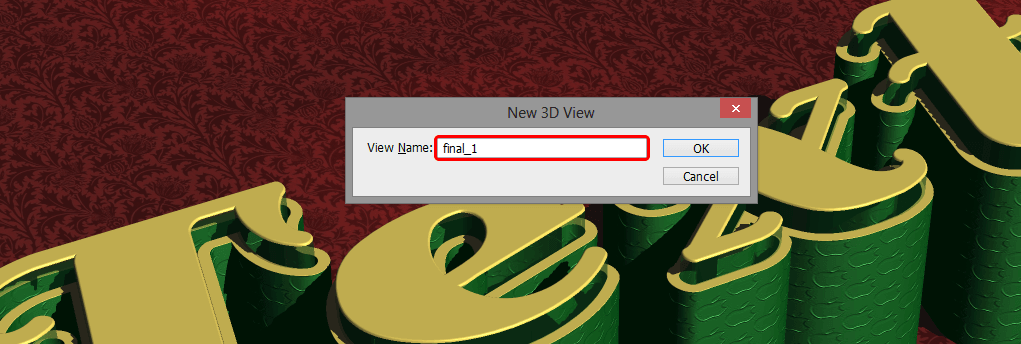
The view will be added down the 3D panel and to the "View menu". So whenever you change the camera angle and want to get back to this view just click its tab in the 3D panel or choose it from the View menu "Final_1".
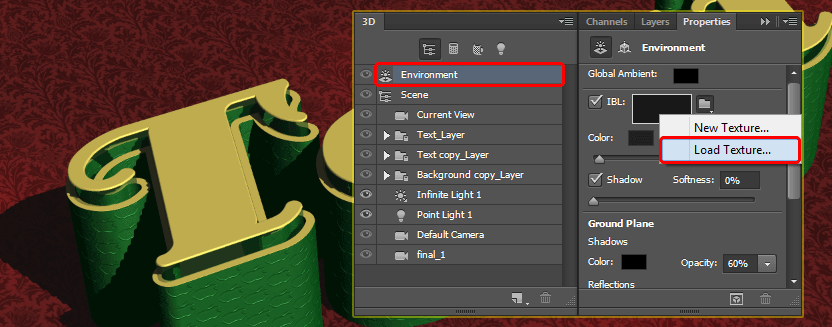
6.18 Click on Environment Tab and Load The Texture by clicking or IBL folder icon
Click on the "Environment tab" in the 3D panel, then click its IBL folder icon in the Properties panel and choose Load Texture image.
Open the “copper metallic pipes texture", and change the Intensity to 25%.
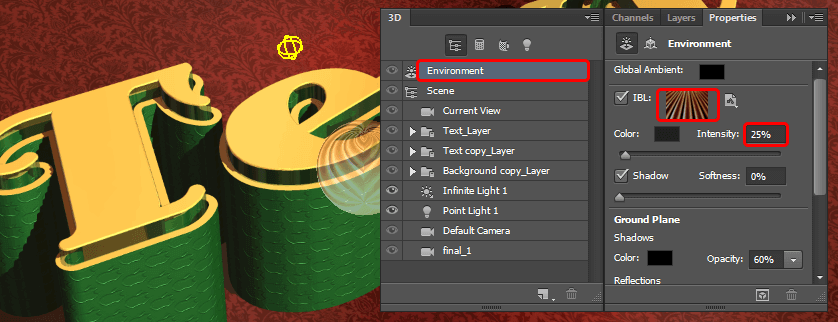
You can use the Move Tool - click and drag the Environment texture’s sphere to move it in the scene until you like how it looks.
Step 7 Rendre The 3D Scene
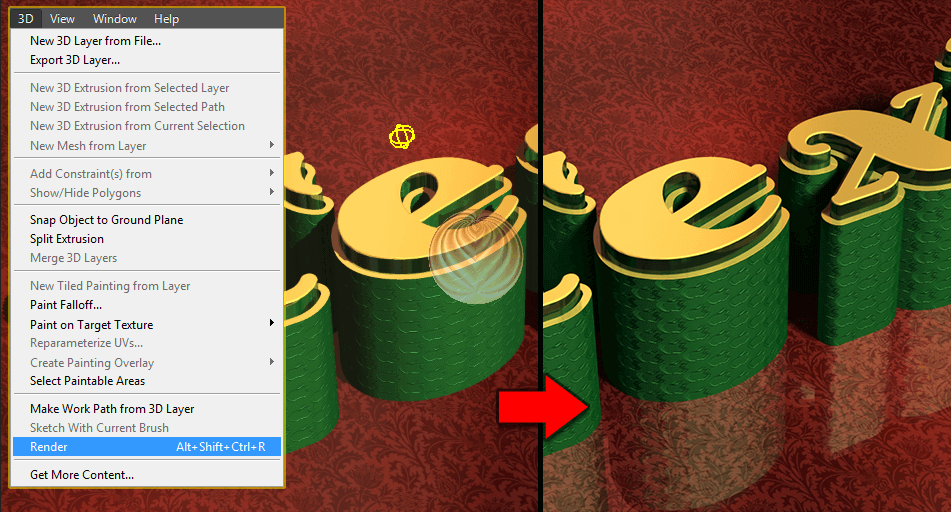
When you're done modify the scene, go ahead and render it (3D > Render).
The "rendering" might take a while, but you can "stop" it anytime by pressing the Esc key.
Hope you learnt something from this tutorial. Keep coming for more exciting tutorials.
I hope you find this blog is very helpful while creating 3D Text Effect in Photoshop. Let me know in comment if you have questions regarding 3D Text Effect. I will reply you ASAP.
Got an Idea of Game Development? What are you still waiting for? Contact us now and see the Idea live soon. Our company has been named as one of the best Game Development Company in India.

I am game graphics designer at TheAppGuruz, I designed graphics for many 2D & 3D games. Here I am writing blog about one of my favorite concept of 3D graphics; love to share this with you.
Introduction to the all new Laravel 5
