Be patient..... we are fetching your source code.
Objective
The main objective of this blog post is to create custom cells in UITableView which is created by the developer instead of the default cell type that is used by xcode.
Introduction:
One of the important components of UIKit framework is UITableView, which is basically used for displaying large or small set of data. A class named UITableViewCell defines various attributes and behavior of cells of table view. It includes various properties and methods for setting and getting contents of the cell.
For example, it handles delegate methods according to various sections such as, selecting cell, deselecting cell etc.
Step 1 Create Xcode Project
Now, create a new xCode Project and name it CustomizingTableViewCell. This project will contain a single view controller, which is our main view controller.
Step 2 Design UI
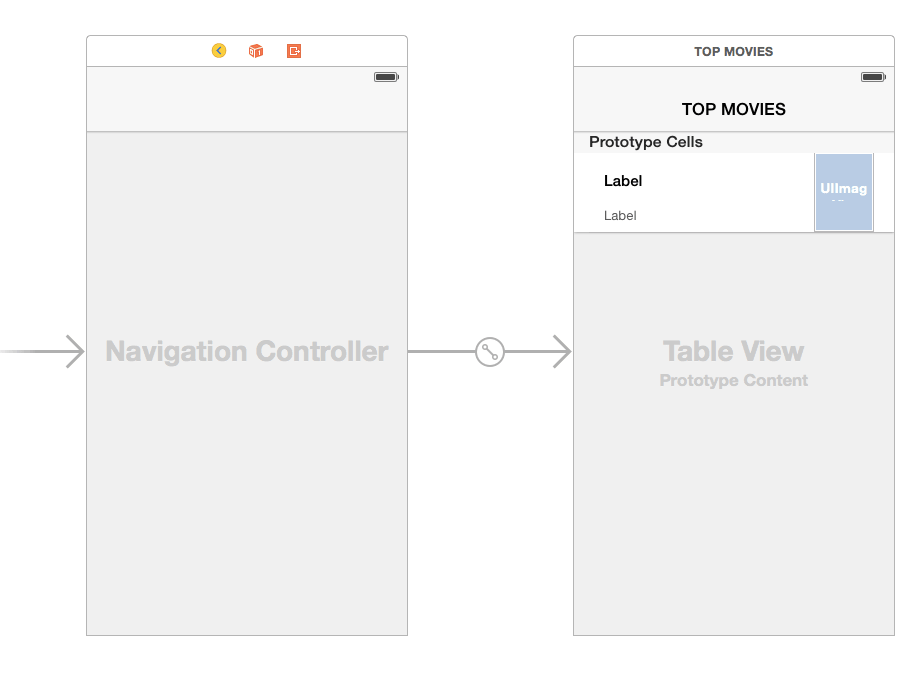
Go to the Main.storyboard file and select the View Controller. Delete it and drag a Table View Controller to the storyboard. Now embed this table view controller to UINavigationController by selecting Editor (form top menu) >> Embed In >> Navigation Controller. Double click on the title bar of the UITableViewController and name it as Top Movies.
The storyboard will appear as shown in the following picture:
Step 3 Remove auto generated file
Now, delete ViewController.h and ViewController.m file from the project. Add a new objective-c class template and name it MoviesTableViewController and make it a subclass of UITableViewController. Return to storyboard, select TableViewController and in the identity inspector tab set class to MoviesTableViewController.
Step 4 Create NSMutableArray
In the MoviesTableViewController.h add a property named marrMovies which contains the data model of your app.
@property (nonatomic,strong) NSMutableArray *marrMovies;
Step 5 Create Movie.h & Movie.m file
Add a new file to the project which is a subclass of NSObject. Name it as Movie and make it a subclass of NSObject.
Change Movie.h as following:
@interfaceMovie :NSObject

@property (nonatomic, copy) NSString *title;
@property (nonatomic, copy) NSString *year;
@property (nonatomic, copy) NSString *poster;
@end
This will contain the title, year and a reference to the filename of the poster image of a movie.
Step 6 Initialiazed Movie object on viewDidLoad
Add a folder named Movies Poster which contains posters of the movies, which are to be displayed as an image of the cell.You can get that folder from the DEMO Project, which is available for download.
In the MoviesTableViewController.m import the newly created class.
#import "Movie.h"

Change ViewDidLoad as following:

- (void)viewDidLoad {
    [superviewDidLoad];

self.marrMovies = [NSMutableArrayarrayWithCapacity:5];

Movie *movie = [[Moviealloc] init];
movie.title = @"Dhoom";
movie.year = @"2000";
movie.poster = @"Dhoom_poster.jpg";
    [self.marrMoviesaddObject:movie];

movie = [[Moviealloc] init];
movie.title = @"DedhIshquiya";
movie.year = @"2013";
movie.poster = @"DedhIshquiya.jpg";
    [self.marrMoviesaddObject:movie];

movie = [[Moviealloc] init];
movie.title = @"Happy New Year";
movie.year = @"2014";
movie.poster = @"HappyNewYear_Poster.jpg";
    [self.marrMoviesaddObject:movie];

movie = [[Moviealloc] init];
movie.title = @"Luck By Chance";
movie.year = @"2010";
movie.poster = @"LuckByChance_Poster.jpg";
    [self.marrMoviesaddObject:movie];

movie = [[Moviealloc] init];
movie.title = @"Vicky Donor";
movie.year = @"2012";
movie.poster = @"VickyDonor_Poster.jpg";
    [self.marrMoviesaddObject:movie];
}
Step 7 Initialized in CustomeCell
To implement the tableView:cellForRowAtIndexPath method, we first need to create our own prototype cells. Add a new file to the project, name it as MovieTableViewCell and make it a subclass of UITableViewCell.
Change MovieTableViewCell.h file as following:
@interfaceMoviesTableViewCell :UITableViewCell

@property (weak, nonatomic) IBOutletUILabel *lblTitle;
@property (weak, nonatomic) IBOutletUILabel *lblYear;
@property (weak, nonatomic) IBOutletUIImageView *imgPoster;

@end
In Main.storyboard, select the prototype cell and in its Identity Inspector panel change its class to MovieTableViewCell.
Prototype cells allow you to design a custom layout for your cells directly from the storyboard editor. Select the empty prototype cell and in the Attributes inspector set the Reuse Identifier as MovieCell. You can get a clear idea by viewing the images given below.
Step 8 Design CustomCell
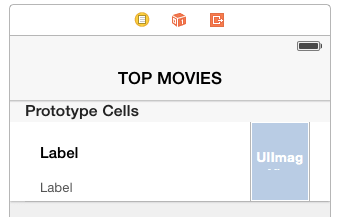
Next, we need to customize our prototype cell. Select the Table View Cell and in the Size Inspector tick panel select the custom checkbox and set the Row Height to 80.

Drag two Labels and an Image View to the Prototype Cell. Change the values in the Property and Size inspector to
| label1 | Font (System Bold 15.0). Width 150, Height 40 |
| label2 | Font (System 13.0). Color - Light Gray color. Width 150, Height 40 |
| Image View | mode Aspect Fit. Width 60, Height 80 |
The cell should look like this:
Step 9 Create IBOutlet in CustomCell
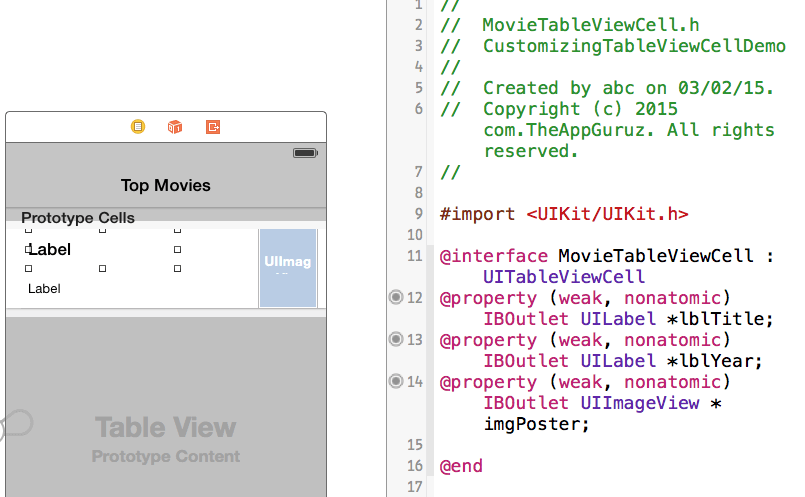
Now we connect outlets from the MovieCell to the MovieTableViewCell header file.Three outlets will be from Label1 which will contain the movie name. Label2 will contain the year in which it was released and outlet from image view will contain the movie poster.
Step 10 UITableViewDelegate Methods
In MovieTableViewController.m import the class MovieTableViewCell.h
#import "MoviesTableViewCell.h"

Now change the tableView:cellForRowAtIndexPath to
- (UITableViewCell *)tableView:(UITableView *)tableViewcellForRowAtIndexPath:(NSIndexPath *)indexPath
{

staticNSString *cellIdentifier = @"MovieCell";
MoviesTableViewCell *cell = [tableViewdequeueReusableCellWithIdentifier:cellIdentifierforIndexPath:indexPath];

Movie *movie = (self.marrMovies)[indexPath.row];
cell.lblTitle.text = movie.title;
cell.lblYear.text = movie.year;
cell.imgPoster.image = [UIImageimageNamed:movie.poster];

return cell;
}
Now Build and Run the project, the top movies will be displayed in the custom Table View Cells.
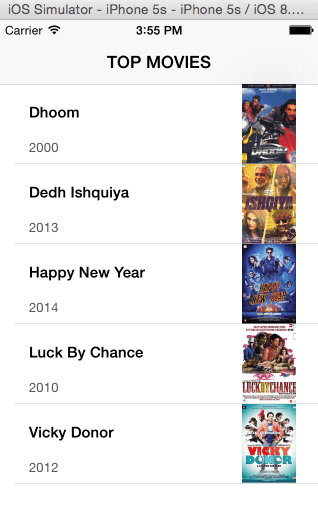
I hope you find this blog very helpful while Customize Table View Cells for UITableView in iOS. Let me know in comment if you have any question regarding Customize Table View Cells. I will reply you ASAP.
Got an Idea of iPhone App Development? What are you still waiting for? Contact us now and see the Idea live soon. Our company has been named as one of the best iPhone App Development Company in India.

I am a Techno Freak who likes to explore new technologies and as an iOS developer and enthusiast I try to learn new things which polish my development skills, so that applications are made more users friendly.
How To Use Android CursorLoader - Example
Working With Quick Selection Tool
