
Be patient..... we are fetching your source code.
Objective
This tutorial describes how to use iCarosel control in your application when you are dealing with Paged & Number of scrolled Views.
Output:
What is iCarousel?
Following points to remember:
- iCarousel is a third party library that is used to implement different types of carousel in iOS.
- In general terms, a carousel is referred to as a merry-go-round at a common fair. Here the term is used for same, as it contains a number of paged and effectively scrolled views.
- iCarousel provides a number of effects with a simple implementation of code like flat, cover flow, cylindrical etc.
- iCarousel can deal with any kind of view rather than images.
- It provides an ideal way for representing paged data in an effective manner within your app.
- It’s very simple and handy to implement just because of its minimal line of code.
This tutorial gives you brief idea about how to implement iCarousel in your application by following steps given below.
Step 1 Integrate iCarousel library
1.1 Download iCarousel library
You can download iCarousel class file from following GitHub link
1.2 Copy iCarousel library into project repository
Unzip downloaded file and find iCarousel folder, which contains two files named iCarousel.h and iCarousel.m. Copy iCarousel folder to your project repository.
1.3 Add QuartzCore framework to the project
To use iCarousel third party library, you have to add QuartzCore Famework For that, Go to
Build phases >> link binary with libraries >> QuartzCore.framework.
Step 2 Create Layout
Create layout from storyboard as following. It contains two UIViewController with UILabel, UIView and UIButton.
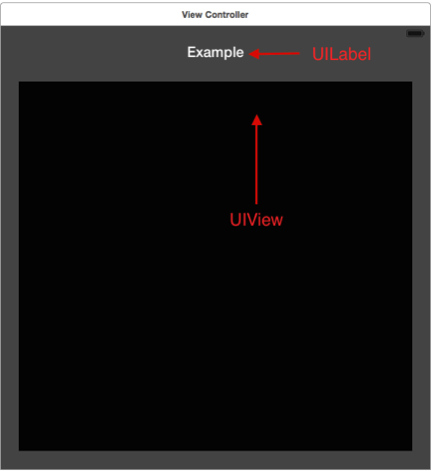
ViewController.swift (Figure -1)
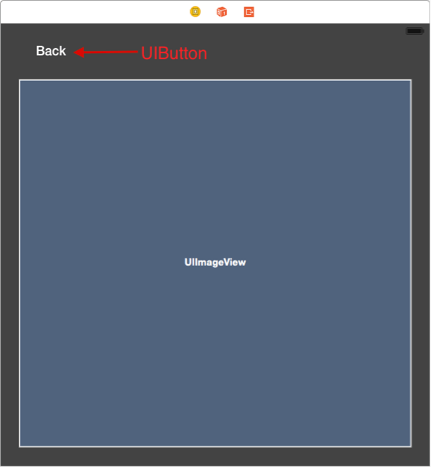
ImageViewDisplyViewController.swift (Figure -2)
If you already have an idea about creating layouts then directly jump to Step-3.
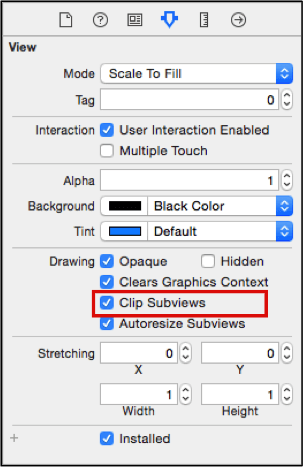
2.1 Clip Subviews
Select UIView (figure-1) and check its Clip Subviews property from Attribute inspector panel.
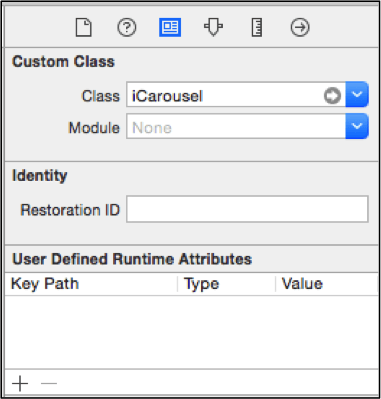
2.2 Set iCarousel Class
Now select UIView, set its class as iCarousel from Identity inspector panel.
2.3 Create property for iCarousel
Now create an outlet to ViewController.swift file from storyboard as following.
@IBOutlet var vwCarousel: iCarousel!
2.4 Create Segue
Create segue named imageDisplaySegue from ViewController to ImageDisplayViewController.
Step 3 Add images
3.1 Add an image folder to project repository
In this case, I have used images folder, which contains 10 different flower images. It is already copied to project repository. (If you want to change then make folder with your requirement of images and copy it to project repository). You can directly download Image Folder that is used throughout the project.
3.2 Create an image array
Declare an array, which contain names of all images available in the folder created above. (In this tutorial we have 10 images named 1.jpg, 2.jpg etc.).
So you have to declare an array as follows:
images = NSMutableArray(array: ["1.jpg","2.jpg","3.jpg","4.jpg","5.jpg","6.jpg","7.jpg","8.jpg","9.jpg","10.jpg"])
Challenge: How to display images other than .jpg in iCarouseal?
Step 4 Set iCarousel Type
Whenever you are dealing with iCarousel, you have to specify a behavior of iCarousel. iCarousel available with a number of types, each of them is different in its presentation behavior.
You can give any of them from the following listing:
- iCarouselTypeLinear:
- iCarouselTypeRotary:
- iCarouselTypeInvertedRotary:
- iCarouselTypeCylinder:
- iCarouselTypeInvertedCylinder:
- iCarouselTypeWheel:
- iCarouselTypeInvertedWheel:
- iCarouselTypeCoverFlow:
- iCarouselTypeCoverFlow2:
- iCarouselTypeTimeMachine:
- iCarouselTypeInvertedTimeMachine:
You can get detailed idea about each type and its behavior from:
You have to write following lines of code once an array has been initialized.
vwCarousel.type = iCarouselType.Cylinder
vwCarousel .reloadData()
Step 5 Handle iCarousel data source and events
5.1 Number Of Items(View) In Carouse
Here we are implementing iCarousel delegate methods to display a number of images in UIImageView in scrolling carousel.
func numberOfItemsInCarousel(carousel: iCarousel) -> Int
{
    			return images.count
}
5.2 Create an Item (View)
Here we are creating UIImageView in iCarousel and reusing it just like UITableViewCell in UITableView. Set image for particular UIImageView available at index.
If you would like to learn more about UITableView, please refer the mentioned links:
- http://www.theappguruz.com/blog/create-uitableview-control-ios
- http://www.theappguruz.com/blog/ios-table-view-tutorial-using-swift
func carousel(carousel: iCarousel, viewForItemAtIndex index: Int, reusingView view: UIView?) -> UIView
{
    var itemView: UIImageView
    if (view == nil)
    {
        itemView = UIImageView(frame:CGRect(x:0, y:0, width:200, height:200))
        itemView.contentMode = .ScaleAspectFit
    }
    else
    {
        itemView = view as! UIImageView;
    }
    itemView.image = UIImage(named: "\(images.objectAtIndex(index))")
    return itemView
}
5.3 Select any Carousel item
When a user clicks on any images available in iCarousel, segue triggers programmatically. Generally segue initiated automatically when a user clicks on any image from iCarousel.
func carousel(carousel: iCarousel, didSelectItemAtIndex index: Int)
 {
    selectedIndex = index
    self .performSegueWithIdentifier("imageDisplaySegue", sender: nil)
}
When segue triggers, we are passing selected image to the destination view controller. In our case, we can achieve this by overriding prepareForSegue method as following.
override func prepareForSegue(segue: UIStoryboardSegue, sender: AnyObject!)
{
    if (segue.identifier == "imageDisplaySegue")
    {
        var viewController : ImageDisplayViewController = segue.destinationViewController as! ImageDisplayViewController
        viewController.selectedImage = UIImage(named: "\(images.objectAtIndex(selectedIndex))")
    }
}
Step 6 Display selected Image
When ImageDisplayViewController is loaded, an image will be set to image view available in view controller (Figure-2).
override func viewDidLoad() {
        super.viewDidLoad()
        ivDisplayImage.image = selectedImage
}
I hope you will find this post very useful while working with iCarousel View Controller in Swift. Let me know in comment if you have any questions regarding in Swift. I will reply you ASAP.
Got an Idea of iPhone App Development? What are you still waiting for? Contact us now and see the Idea live soon. Our company has been named as one of the best iPhone App Development Company in India.

I am iOS developer, as a developer my basic goal is continue to learn and improve my development skills , to make application more user friendly.
