Be patient..... we are fetching your source code.
Objective
The main objective of this tutorial is to explain how to integrate PayPal in android.
Introduction:
PayPal provides Android SDK that makes it easy for the developers to accept app payments on Google’s mobile phone. The android payments solution accepts both PayPal and Credit card payments. PayPal says that it also offers security features that will allow developers to significantly reduce fraud that they encounter with payments.
Following are the steps to integrate PayPal in android.
Step 1 Create PayPal Developer Account
First we need a PayPal Developer account to test our app.
You can create account using the following link:

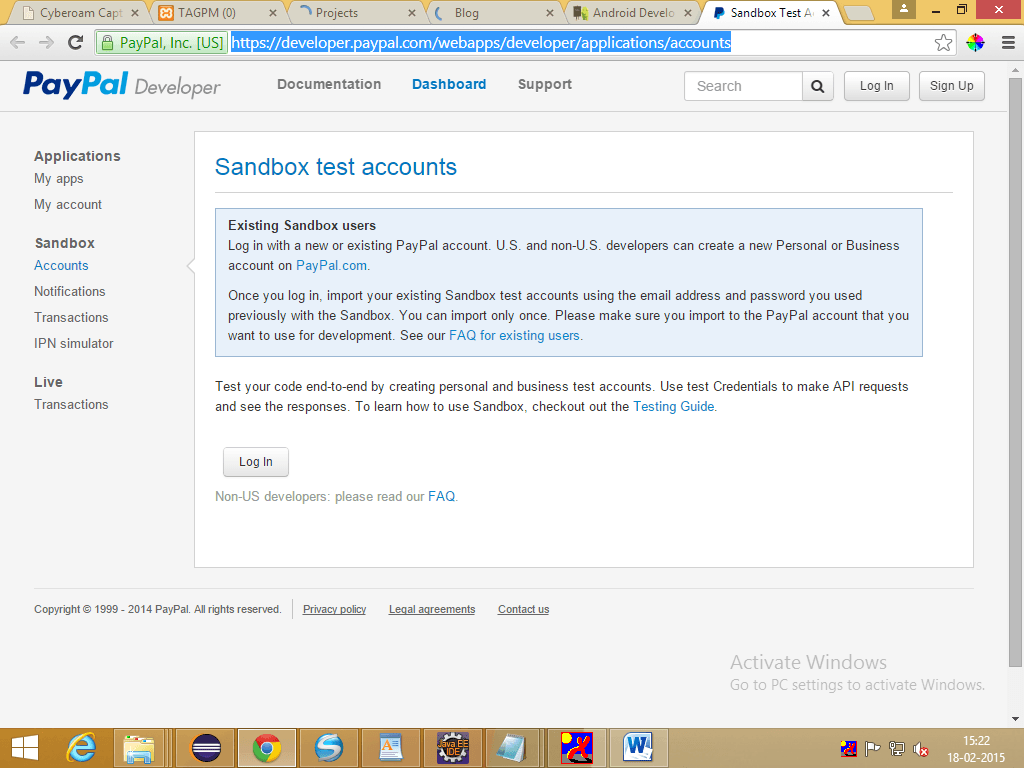
Login into PayPal developer and after that the following screen will be displayed.

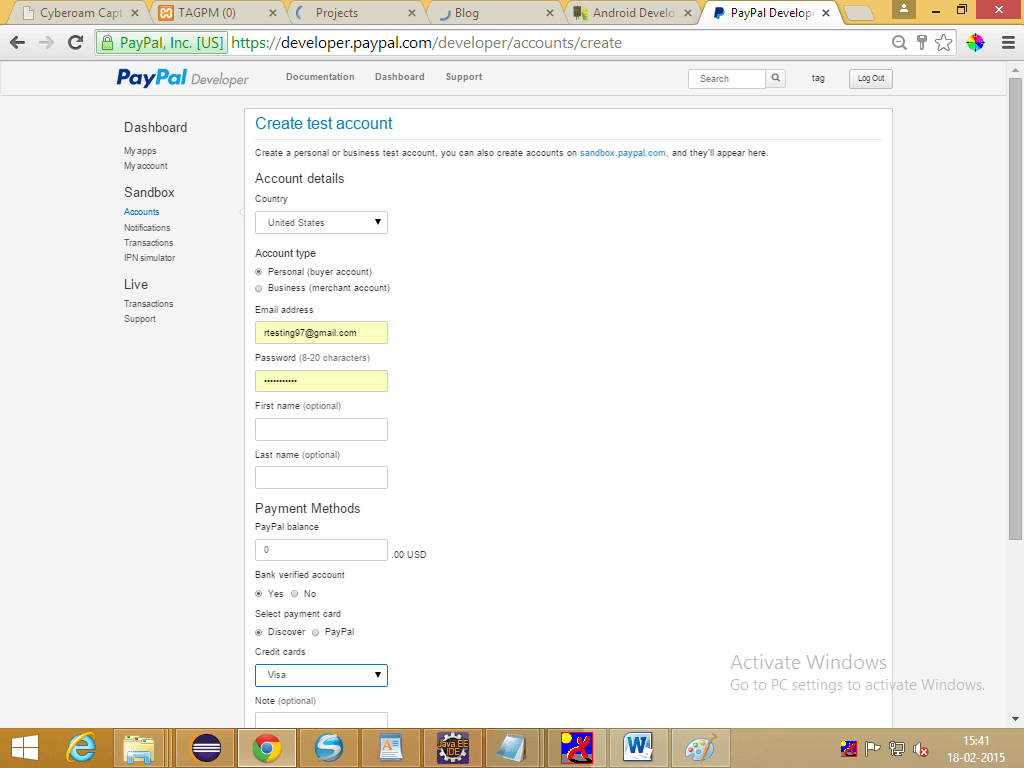
On Clicking, Create Account button, it displays the following screen where you can add new testing personal that is buyer or Business that is merchant account.

Step 2 Download Code from GitHub
Download the code that we have posted on github to get PayPal Android SDK and copy paste that in your project libs folder.
Step 3 Create Layout File
Now create the following layout file:
<LinearLayoutxmlns:android="http://schemas.android.com/apk/res/android"
android:layout_width="fill_parent"
android:layout_height="fill_parent"
android:orientation="vertical">

<LinearLayout
android:layout_width="match_parent"
android:layout_height="match_parent"
android:orientation="vertical">

<LinearLayout
android:layout_width="match_parent"
android:layout_height="wrap_content"
android:layout_weight="1"
android:gravity="center"
android:orientation="vertical">

<ImageView
android:id="@+id/imageView1"
android:layout_width="wrap_content"
android:layout_height="wrap_content"
android:layout_gravity="center"
android:src="@drawable/product"/>
</LinearLayout>


<LinearLayout
android:layout_width="match_parent"
android:layout_height="wrap_content"
android:gravity="center"
android:orientation="vertical">

<TextView
android:id="@+id/textView1"
android:layout_width="wrap_content"
android:layout_height="wrap_content"
android:layout_weight="1"
android:text="@string/amount"
android:textAppearance="?android:attr/textAppearanceSmall"/>

<Button
android:id="@+id/order"
android:layout_width="wrap_content"
android:layout_height="wrap_content"
android:layout_weight="1"
android:text="@string/take_order"/>
</LinearLayout>

</LinearLayout>

</LinearLayout>
Suppose you want to sell headset worth $10.
Step 4 Create An Application On Paypal Developer Site.
To get sandbox client_id for the app, we need to create an application on PayPal developer.
To get client_id create application using the following link in PayPal developer:
Step 5 Get client_id
After creating the app on PayPal developer, copy the client_id and paste it in your MainActivity as follows:
privatestaticfinal String CONFIG_CLIENT_ID = "your client id";
and set environment to sandbox as following:
privatestaticfinal String CONFIG_ENVIRONMENT = PayPalConfiguration.ENVIRONMENT_SANDBOX;
Step 6 PayPal Payment Android
Now, when the Button is clicked, it creates PayPalPaymentobject using which we can give the name of the product and price of the product.
After that start PayPal activity as shown below:
thingToBuy = newPayPalPayment(newBigDecimal("10"), "USD",
                        "HeadSet", PayPalPayment.PAYMENT_INTENT_SALE);
                Intent intent = newIntent(MainActivity.this,
                        PaymentActivity.class);

                intent.putExtra(PaymentActivity.EXTRA_PAYMENT, thingToBuy);

                startActivityForResult(intent, REQUEST_CODE_PAYMENT);
Step 7 MainActivity.java file
Create your activity class as given below:
public class MainActivity extends Activity {

    // private static final String TAG = "paymentdemoblog";
    /**
     * - Set to PaymentActivity.ENVIRONMENT_PRODUCTION to move real money.
     *
     * - Set to PaymentActivity.ENVIRONMENT_SANDBOX to use your test credentials
     * from https://developer.paypal.com
     *
     * - Set to PayPalConfiguration.ENVIRONMENT_NO_NETWORK to kick the tires
     * without communicating to PayPal's servers.
     */
    // private static final String CONFIG_ENVIRONMENT =
    // PayPalConfiguration.ENVIRONMENT_NO_NETWORK;
    private static final String CONFIG_ENVIRONMENT = PayPalConfiguration.ENVIRONMENT_SANDBOX;

    // note that these credentials will differ between live & sandbox
    // environments.
    private static final String CONFIG_CLIENT_ID = "AVZUbOX3ry-gyvTBVykh9TnK1v49hM0ycQiquryr8NjuRwnayplCFEm1M4ZnK5Q9JCcWzn5_briWUeRH";

    private static final int REQUEST_CODE_PAYMENT = 1;
    private static final int REQUEST_CODE_FUTURE_PAYMENT = 2;

    private static PayPalConfigurationconfig = new PayPalConfiguration()
            .environment(CONFIG_ENVIRONMENT)
            .clientId(CONFIG_CLIENT_ID)
            // the following are only used in PayPalFuturePaymentActivity.
            .merchantName("Hipster Store")
            .merchantPrivacyPolicyUri(
                    Uri.parse("https://www.example.com/privacy"))
            .merchantUserAgreementUri(
                    Uri.parse("https://www.example.com/legal"));

    PayPalPaymentthingToBuy;

    @Override
    protected void onCreate(Bundle savedInstanceState) {
        super.onCreate(savedInstanceState);
        setContentView(R.layout.activity_main);

        Intent intent = new Intent(this, PayPalService.class);
        intent.putExtra(PayPalService.EXTRA_PAYPAL_CONFIGURATION, config);
        startService(intent);
        findViewById(R.id.order).setOnClickListener(new OnClickListener() {

            @Override
            public void onClick(View v) {
                thingToBuy = new PayPalPayment(new BigDecimal("10"), "USD",
                        "HeadSet", PayPalPayment.PAYMENT_INTENT_SALE);
                Intent intent = new Intent(MainActivity.this,
                        PaymentActivity.class);

                intent.putExtra(PaymentActivity.EXTRA_PAYMENT, thingToBuy);

                startActivityForResult(intent, REQUEST_CODE_PAYMENT);
            }
        });

    }

    public void onFuturePaymentPressed(View pressed) {
        Intent intent = new Intent(MainActivity.this,
                PayPalFuturePaymentActivity.class);

        startActivityForResult(intent, REQUEST_CODE_FUTURE_PAYMENT);
    }

    @Override
    protected void onActivityResult(intrequestCode, intresultCode, Intent data) {
        if (requestCode == REQUEST_CODE_PAYMENT) {
            if (resultCode == Activity.RESULT_OK) {
                PaymentConfirmation confirm = data
                        .getParcelableExtra(PaymentActivity.EXTRA_RESULT_CONFIRMATION);
                if (confirm != null) {
                    try {
                        System.out.println(confirm.toJSONObject().toString(4));
                        System.out.println(confirm.getPayment().toJSONObject()
                                .toString(4));

                        Toast.makeText(getApplicationContext(), "Order placed",
                                Toast.LENGTH_LONG).show();

                    } catch (JSONException e) {
                        e.printStackTrace();
                    }
                }
            } else if (resultCode == Activity.RESULT_CANCELED) {
                System.out.println("The user canceled.");
            } else if (resultCode == PaymentActivity.RESULT_EXTRAS_INVALID) {
                System.out
                        .println("An invalid Payment or PayPalConfiguration was submitted. Please see the docs.");
            }
        } else if (requestCode == REQUEST_CODE_FUTURE_PAYMENT) {
            if (resultCode == Activity.RESULT_OK) {
                PayPalAuthorizationauth = data
                        .getParcelableExtra(PayPalFuturePaymentActivity.EXTRA_RESULT_AUTHORIZATION);
                if (auth != null) {
                    try {
                        Log.i("FuturePaymentExample", auth.toJSONObject()
                                .toString(4));

                        String authorization_code = auth.getAuthorizationCode();
                        Log.i("FuturePaymentExample", authorization_code);

                        sendAuthorizationToServer(auth);
                        Toast.makeText(getApplicationContext(),
                                "Future Payment code received from PayPal",
                                Toast.LENGTH_LONG).show();

                    } catch (JSONException e) {
                        Log.e("FuturePaymentExample",
                                "an extremely unlikely failure occurred: ", e);
                    }
                }
            } else if (resultCode == Activity.RESULT_CANCELED) {
                Log.i("FuturePaymentExample", "The user canceled.");
            } else if (resultCode == PayPalFuturePaymentActivity.RESULT_EXTRAS_INVALID) {
                Log.i("FuturePaymentExample",
                        "Probably the attempt to previously start the PayPalService had an invalid PayPalConfiguration. Please see the docs.");
            }
        }
    }

    private void sendAuthorizationToServer(PayPalAuthorization authorization) {

    }

    public void onFuturePaymentPurchasePressed(View pressed) {
        // Get the Application Correlation ID from the SDK
        String correlationId = PayPalConfiguration
                .getApplicationCorrelationId(this);

        Log.i("FuturePaymentExample", "Application Correlation ID: "
                + correlationId);

        // TODO: Send correlationId and transaction details to your server for
        // processing with
        // PayPal...
        Toast.makeText(getApplicationContext(),
                "App Correlation ID received from SDK", Toast.LENGTH_LONG)
                .show();
    }

    @Override
    public void onDestroy() {
        // Stop service when done
        stopService(new Intent(this, PayPalService.class));
        super.onDestroy();
    }
}
Step 8 Get Required Permission Through AndroidManifest File
To open PayPal activity and to start PayPal Service we need to register it in the androidmainfest file as follows:
<uses-permissionandroid:name="android.permission.CAMERA"/>
<uses-permissionandroid:name="android.permission.VIBRATE"/>

<uses-featureandroid:name="android.hardware.camera"android:required="false"/>
<uses-featureandroid:name="android.hardware.camera.autofocus"android:required="false"/>

<!-- for most things, including card.io &paypal -->
<uses-permissionandroid:name="android.permission.ACCESS_NETWORK_STATE"/>
<uses-permissionandroid:name="android.permission.ACCESS_WIFI_STATE"/>
<uses-permissionandroid:name="android.permission.INTERNET"/>

<actionandroid:name="android.intent.action.MAIN"/>

<categoryandroid:name="android.intent.category.LAUNCHER"/>

<serviceandroid:name="com.paypal.android.sdk.payments.PayPalService"android:exported="false"/>

<activityandroid:name="com.paypal.android.sdk.payments.PaymentActivity"/>
<activityandroid:name="com.paypal.android.sdk.payments.LoginActivity"/>
<activityandroid:name="com.paypal.android.sdk.payments.PaymentMethodActivity"/>
<activityandroid:name="com.paypal.android.sdk.payments.PaymentConfirmActivity"/>
<activityandroid:name="com.paypal.android.sdk.payments.PayPalFuturePaymentActivity"/>
<activityandroid:name="com.paypal.android.sdk.payments.FuturePaymentConsentActivity"/>
<activityandroid:name="com.paypal.android.sdk.payments.FuturePaymentInfoActivity"/>

<activityandroid:name="io.card.payment.DataEntryActivity"/>
Note
To obtain your live credentials, you need to have a business account. After that you just need to change client_id to live client id and config environment variable to ENVIRONMENT_PRODUCTION in your activity as shown.
privatestaticfinal String CONFIG_ENVIRONMENT = PayPalConfiguration.ENVIRONMENT_PRODUCTION;
I hope you find this blog is very helpful while Integrating PayPal Account in Android Application. Let me know in comment if you have any question regarding PayPal Integration in Android.
Also check out following Android Integration:
Learning Android sounds fun, right? Why not check out our other Android Tutorials?
Got an Idea of Android App Development? What are you still waiting for? Contact us now and see the Idea live soon. Our company has been named as one of the best Android App Development Company in India.

I am android developer, and do development not because to get paid or get adulation by the public, but because it is fun to program. I have been working in this field since one and half year.
Introduction of Mathf Class
