Be patient..... we are fetching your source code.
Objective
Step by step process is explained here on how to work SQLite Database in iOS.
SQLite Database has methods to create, delete and perform other common database management tasks.
Following are the steps that give you a brief introduction to using FMDB to create a database, create a table, insert, fetch, and delete data.
Step 1 What is FMDB ?
FMDB:stands for Flying Meat Database. This project aims to be a fully featured wrapper for SQLite.
You can clone their repository on https://github.com/ccgus/fmdb. The first step is to download/clone fmdb from the url above. Once downloaded drag everything inside of the src folder into your project.
Step 2 Link The SQLite Library
The next step is to link in the sqlite library. To do this:
- Click your project in the left column of XCode
- Click the main target in the middle column.
- Click the Build Phases tab in the third column.
- Expand the arrow next to Link Binary With Libraries.
- Click the + button.
- Search for libsqlite3.0.dylib and double click it.
Step 3 Create DB in SQLiteManager
First create your database and your table you want to interact with.
For that go to Firefox Browser >> Tools menu >>Click on SQLite Manager
Create Database and insert table according to your requirement Save it to project folder.
[in our case we are creating database named studentdb.sqlite and insert table to it named studentInfo which contains two field named rollnum and name]
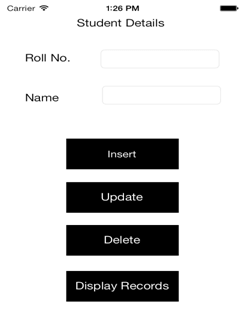
Step 4 Design UI
Prepare UserInterface as per Following picture.

Step 5 copy DB from App to Device
Creating A Database Obviously where you create your database is up to you, but we are going to do it in the appDelegate. In addition to working with existing databases, fmdb can easily create any number of databases for you on the fly.
After importing FMDatabase.h in our AppDelegate.m file, we can add the following code to the application:didFinishLaunchingWithOptions method.
NSString *toPath=[self getFilePath:@"studentdb.sqlite"];
NSFileManager *fileManager=[NSFileManagerdefaultManager];
if(![fileManagerfileExistsAtPath:toPath])
{
NSString *fromPath=[[NSBundlemainBundle] pathForResource:@"studentdb" ofType:@"sqlite"];
[fileManagercopyItemAtPath:fromPathtoPath:toPatherror:nil];
}
Step 6 Initialize FMDatabase Instance
Initialize FMDatabase Instance Following is the block of code.
Instance.database=[FMDatabasedatabaseWithPath:[[NSSearchPathForDirectoriesInDomains(NSDocumentDirectory, NSUserDomainMask, YES) objectAtIndex:0] stringByAppendingPathComponent:@"studentdb.sqlite"]];
Step 7 Querying The Database
7.1 Fetch
This method fetch all records from studentInfo table. Once we fetched all data , we need to close the database connection.
(void) displayData
{
    [instance.database open];
FMResultSet *resultSet=[instance.databaseexecuteQuery:@"SELECT * FROM studentInfo"];
if(resultSet)
    {
while([resultSet next])
NSLog(@"Roll number : %@    Name : %@",[resultSetstringForColumn:@"rollnum"],[resultSetstringForColumn:@"name"]);
    }
    [instance.database close];
}
7.2 Insert
This method accepts StudentInfo object as parameter. Once we inserted data in database we need to close the database connection.
(void)insertData:(StudentInfo *)data
{
    [instance.database open];
    BOOL isInserted=[instance.databaseexecuteUpdate:@"INSERT INTO studentInfo (rollnum,name) VALUES (?,?)",data.rollnum,data.name];
    [instance.database close];
if(isInserted)
NSLog(@"Inserted Successfully");
else
NSLog(@"Error occured while inserting");
}
7.3 Update
This method accepts StudentInfo object as parameter.Once we updated data in database we need to close the database connection.
(void)updateData:(StudentInfo *)data
{
    [instance.database open];
    BOOL isUpdated=[instance.databaseexecuteUpdate:@"UPDATE studentInfo SET name=? WHERE rollnum=?",data.name,data.rollnum];
    [instance.database close];
if(isUpdated)
NSLog(@"Updated Successfully");
else
NSLog(@"Error occured while Updating");
}
7.4 Delete
This method accepts StudentInfo object as parameter.Once we deleted data in database we need to close the database connection.
(void)deleteData:(Model *)data
{
    [instance.database open];
    BOOL isDeleted=[instance.databaseexecuteUpdate:@"DELETE FROM studentInfo WHERE rollnum=?",data.rollnum];
    [instance.database close];
if(isDeleted)
NSLog(@"Deleted Successfully");
else
NSLog(@"Error occured while Deleting");
}
I hope you found this blog helpful while SQLite Database in iOS. Let me know if you have any questions or concerns regarding SQLite Database or iOS, please put a comment here and we will get back to you ASAP.
Got an Idea of iPhone App Development? What are you still waiting for? Contact us now and see the Idea live soon. Our company has been named as one of the best iPhone App Development Company in India.

I am iOS developer, as a developer my basic goal is continue to learn and improve my development skills , to make application more user friendly.
