Be patient..... we are fetching your source code.
Objective
The main objective of this blog post is to help you understand the implementation of Ads in Unity using Tapjoy.
This blog would be useful to developers who don’t know anything about Ads or implementing Ads in Unity
Step 1 Introduction
As a developer, you can put a lot of different kind of ads in your Unity project. There are a lot of ad units available like banner ads, offer walls, video ads, so and so forth. And different ad providers give different ad units.
Tapjoy basically provides:
- Offer wall
- Direct play video ad and
- Interstitials
You can follow the steps given below and get a brief idea on how to implement Tapjoy in your Unity game.
Step 2 Find / Create Your SDK Key
Following are steps through which you can create or get your SDK Key:
- Login to Tapjoy.
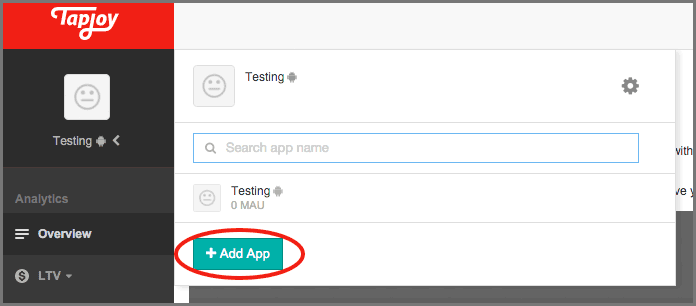
- Create new app if not created.
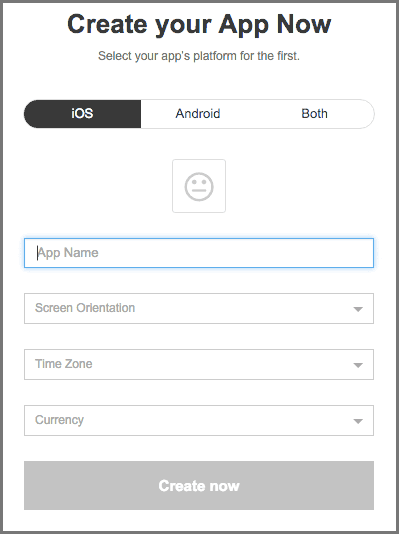
- A popup window will appear. Select Platform then enter App Name, Select Screen Orientation, Select Time Zone, Select Country.
- Click on Create now button. It will display Basic Integration Details.
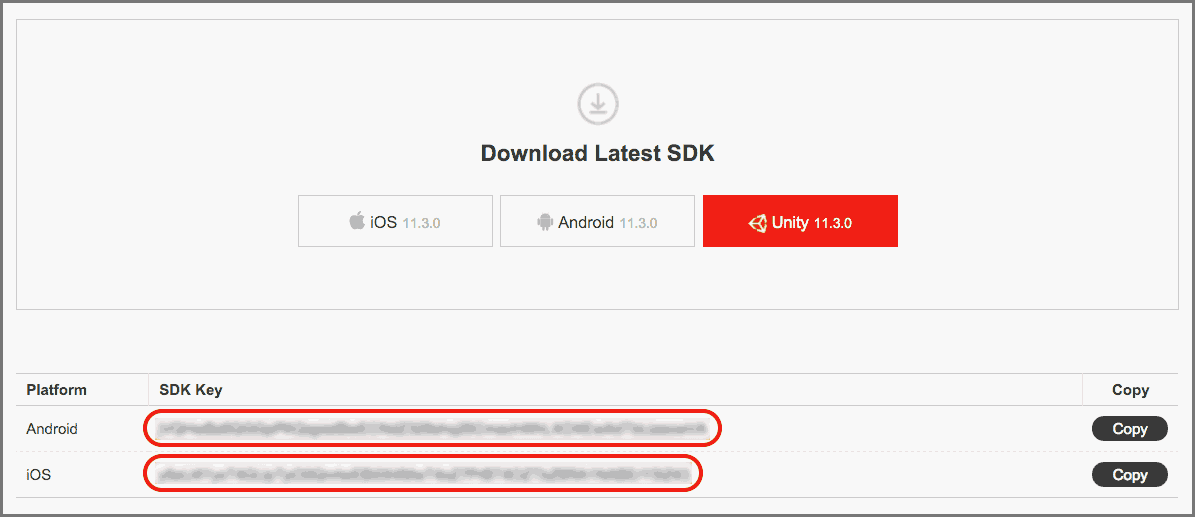
It will display SDK key for the app. Copy the key and store it. You will need that SDK key at the time of integrating Tapjoy ads in your Unity project.
Step 3 Configuration in Unity
To use the Tapjoy plugin, download latest Tapjoy plugin from following link.
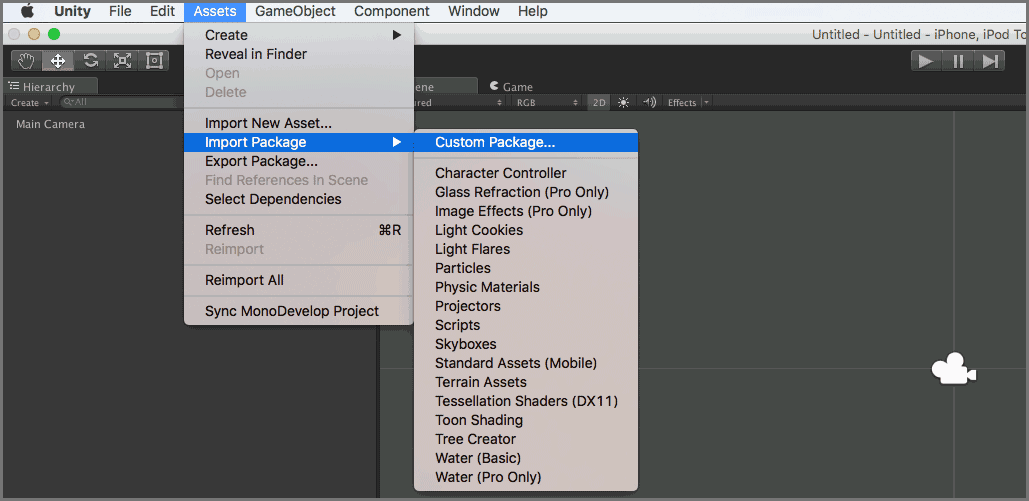
Import the downloaded plugin in Unity as a custom package. To import plugin, goto Asset >> Import Package >> Custom Package.
3.1 Integration in Android
Add required permissions to your AndroidManifest.xml file outside of the tag.
<uses-permission android:name="android.permission.INTERNET" />
 <uses-permission android:name="android.permission.READ_PHONE_STATE" />
 <uses-permission android:name="android.permission.ACCESS_NETWORK_STATE" />
 <uses-permission android:name="android.permission.WRITE_EXTERNAL_STORAGE" />
 <uses-permission android:name="android.permission.ACCESS_WIFI_STATE" />
Add required activities to AndroidManifest.xml file inside application tag.
<activity
  android:name="com.tapjoy.TJAdUnitActivity" android:configChanges="orientation|keyboardHidden|screenSize" android:theme="@android:style/Theme.Translucent.NoTitleBar.Fullscreen" android:hardwareAccelerated="true" />
<activity android:name="com.tapjoy.mraid.view.ActionHandler" android:configChanges="orientation|keyboardHidden|screenSize" />
<activity android:name="com.tapjoy.mraid.view.Browser" android:configChanges="orientation|keyboardHidden|screenSize" />

<meta-data
  android:name="com.google.android.gms.version"
  android:value="@integer/google_play_services_version" />
3.2 Tapjoy Setting in Unity
Following are the steps through which you can configure Tapjoy in Unity:
- Set basic configuration in Unity from Tapjoy Window. You can open Tapjoy window by Window >> Tapjoy menu.
In this window, you can set the Android as well as iOS SDK key to initialize the Tapjoy plugin. For Android target, you have to select the store name. (i.e. Google, Amazon, etc.)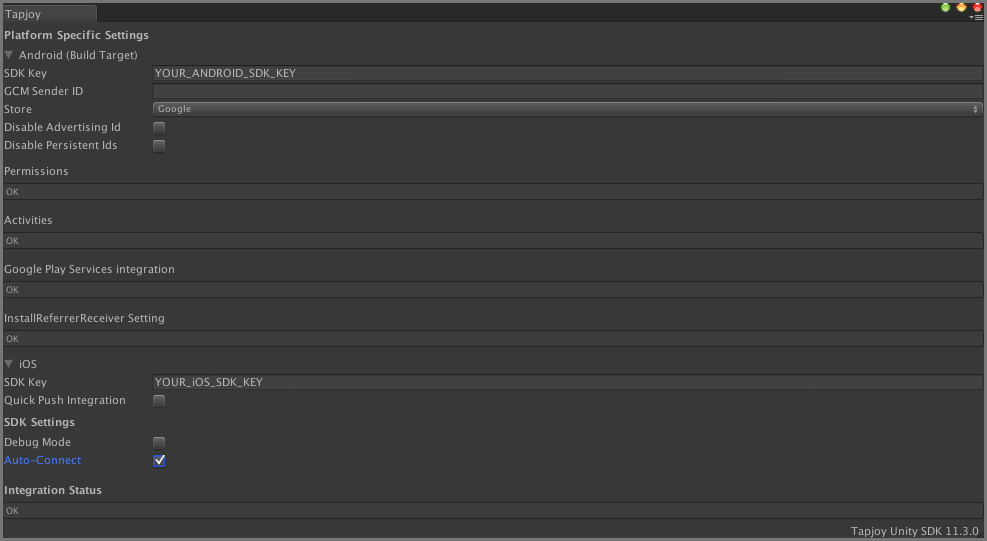
Make sure you have set Auto-Connect checkbox to true else you have to manually connect to Tapjoy server using following lines of code.
if (!Tapjoy.IsConnected) { Tapjoy.Connect(); } - Now add TapjoyUnity game object to your very first scene. You can add TapjoyUnity by GameObject >> Create Other >> Tapjoy >> TapjoyUnity.
Now I will move to create (request) and display placement in the application.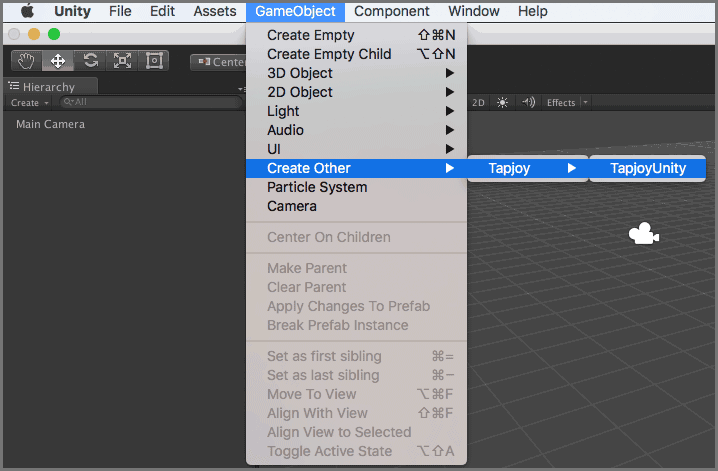
Step 4 Placement
A placement is a place where you can display Tapjoy ads in your application. In placement, you can display an offer wall, a rewarded video or a full screen interstitial.
Tapjoy creates three placements by default:
- AppLaunch
- StageFailed
- InsufficientCurrency
You can create more placement as per your requirements.
The following link will describe recommended placements for different content types:
Following are steps to create placement:
- Go to monetize integration of your application.

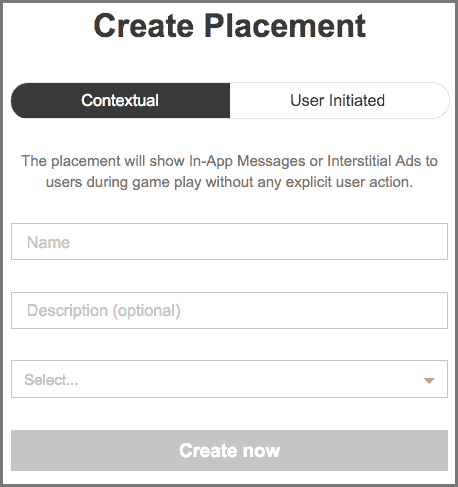
- Click on Create Placement button.

- A new window appears. Set all the placement details and click on Create now button.
4.1 Request and show placement
Check if tapjoy sdk is connected or not:
Tapjoy.IsConnected()
Create and request placement:
TJPlacement appLaunchPlacement = TJPlacement.CreatePlacement("PLACEMENT_NAME");
if (appLaunchPlacement != null)
appLaunchPlacement.RequestContent();
Make sure your PLACEMENT_NAME matches the placement name in the dashboard. Default placement names are AppLaunch, StageFailed, InsufficientCurrency.
Show placement:
if(appLaunchPlacement.IsContentReady())
    appLaunchPlacement.ShowContent();
4.2 Tapjoy ad delegate methods
Register tapjoy delegate methods. Add following lines of code to OnEnable() method.
TJPlacement.OnRequestSuccess += HandlePlacementRequestSuccess;
TJPlacement.OnRequestFailure += HandlePlacementRequestFailure;
TJPlacement.OnContentReady += HandlePlacementContentReady;
TJPlacement.OnContentShow += HandlePlacementContentShow;
TJPlacement.OnContentDismiss += HandlePlacementContentDismiss;
Tapjoy.OnVideoStart += HandleVideoStart;
Tapjoy.OnVideoError += HandleVideoError;
Tapjoy.OnVideoComplete += HandleVideoComplete;
Remove Tapjoy delegate methods. Add following lines of code to OnDisable() method.
TJPlacement.OnRequestSuccess -= HandlePlacementRequestSuccess;
TJPlacement.OnRequestFailure -= HandlePlacementRequestFailure;
TJPlacement.OnContentReady -= HandlePlacementContentReady;
TJPlacement.OnContentShow -= HandlePlacementContentShow;
TJPlacement.OnContentDismiss -= HandlePlacementContentDismiss;
Tapjoy.OnVideoStart -= HandleVideoStart;
Tapjoy.OnVideoError -= HandleVideoError;
Tapjoy.OnVideoComplete -= HandleVideoComplete;
When Tapjoy ads delegate methods are registered, it calls its delegate methods.
Following are the delegates methods:
public void HandlePlacementRequestSuccess(TJPlacement placement)
{
	if (placement.IsContentAvailable())
	{
		Debug.Log("C#: Content available for " + placement.GetName());
	}
	else
	{
		Debug.Log("C#: No content available for " + placement.GetName());
	}
}

public void HandlePlacementRequestFailure(TJPlacement placement, string error)
{
	Debug.Log("C#: HandlePlacementRequestFailure");
	Debug.Log("C#: Request for " + placement.GetName() + " has failed because: " + error);
}

public void HandlePlacementContentReady(TJPlacement placement)
{
	Debug.Log("C#: HandlePlacementContentReady");

	if (placement.IsContentAvailable()) {
		//placement.ShowContent();
	}
	else
	{
		Debug.Log("C#: no content");
	}
}


public void HandlePlacementContentShow(TJPlacement placement)
{
	Debug.Log("C#: HandlePlacementContentShow");
}

public void HandlePlacementContentDismiss(TJPlacement placement)
{
	Debug.Log("C#: HandlePlacementContentDismiss");
}

public void HandleVideoStart ()
{
	Debug.Log ("C#: HandleVideoStarted");
}

public void HandleVideoError (string status)
{
	Debug.Log ("C#: HandleVideoError, status: " + status);
}

public void HandleVideoComplete ()
{
	Debug.Log ("C#: HandleVideoComplete");
}
Step 5 Virtual Currency
You must have at least one virtual currency to use Tapjoy ad.
There are mainly two types of virtual currency:
- Tapjoy Managed: By using Tapjoy managed currency, you can store user’s currency to Tapjoy’s server.
- Self Managed: You can find more details about Self Managed currency from the following link.
You can create virtual currency by following steps given below:
- Go to monetize integration of your application.

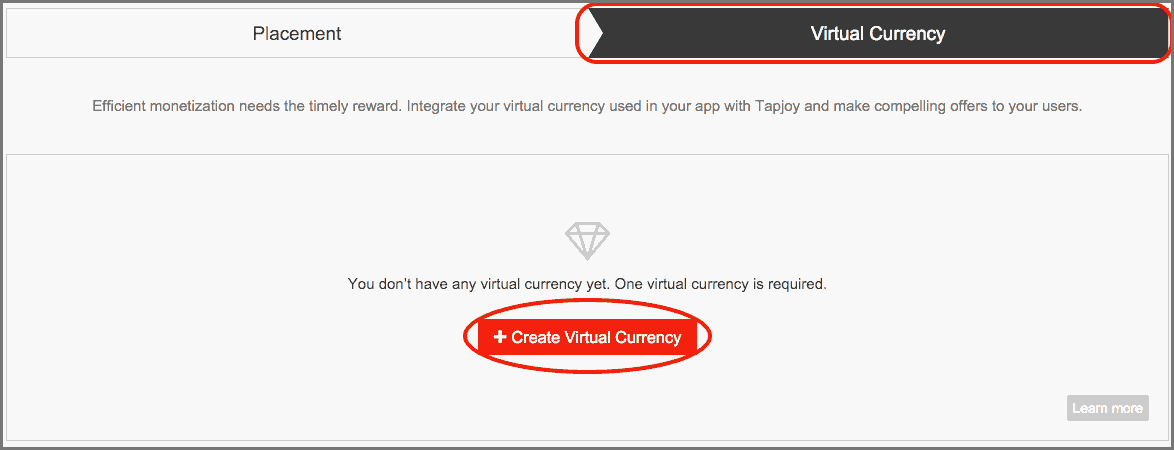
- Select Virtual Currency and click on Create Virtual Currency button.
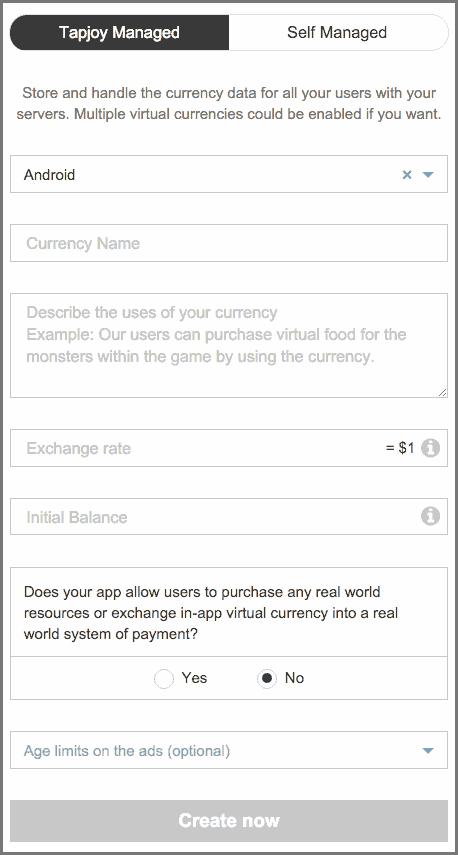
- A new window appears. Set all the virtual currency details and click on Create now button.
5.1 Get and spend virtual currency
Get virtual currency balance:
Tapjoy.GetCurrencyBalance();
Spend virtual currency:
Tapjoy.SpendCurrency(10);
Award virtual currency:
Tapjoy.AwardCurrency(10);
5.2 Tapjoy virtual currency delegate methods
Register tapjoy virtual currency delegate methods. Add following lines of code to OnEnable() method.
Tapjoy.OnAwardCurrencyResponse += HandleAwardCurrencyResponse;
Tapjoy.OnAwardCurrencyResponseFailure += HandleAwardCurrencyResponseFailure;
Tapjoy.OnSpendCurrencyResponse += HandleSpendCurrencyResponse;
Tapjoy.OnSpendCurrencyResponseFailure += HandleSpendCurrencyResponseFailure;
Tapjoy.OnGetCurrencyBalanceResponse += HandleGetCurrencyBalanceResponse;
Tapjoy.OnGetCurrencyBalanceResponseFailure += HandleGetCurrencyBalanceResponseFailure;
Tapjoy.OnEarnedCurrency += HandleEarnedCurrency;
Remove tapjoy virtual currency delegate methods. Add following lines of code to OnEnable() method.
Tapjoy.OnAwardCurrencyResponse -= HandleAwardCurrencyResponse;
Tapjoy.OnAwardCurrencyResponseFailure -= HandleAwardCurrencyResponseFailure;
Tapjoy.OnSpendCurrencyResponse -= HandleSpendCurrencyResponse;
Tapjoy.OnSpendCurrencyResponseFailure -= HandleSpendCurrencyResponseFailure;
Tapjoy.OnGetCurrencyBalanceResponse -= HandleGetCurrencyBalanceResponse;
Tapjoy.OnGetCurrencyBalanceResponseFailure -= HandleGetCurrencyBalanceResponseFailure;
Tapjoy.OnEarnedCurrency -= HandleEarnedCurrency;
When Tapjoy virtual currency delegate methods are registered, it calls its delegate methods.
Following are the delegates methods.
public void HandleAwardCurrencyResponse (string currencyName, int balance)
{
	Debug.Log ("C#: HandleAwardCurrencySucceeded: currencyName: " + currencyName + ", balance: " + balance);
}

public void HandleAwardCurrencyResponseFailure (string error)
{
	Debug.Log ("C#: HandleAwardCurrencyResponseFailure: " + error);
}

public void HandleGetCurrencyBalanceResponse (string currencyName, int balance)
{
	Debug.Log ("C#: HandleGetCurrencyBalanceResponse: currencyName: " + currencyName + ", balance: " + balance);
}


public void HandleGetCurrencyBalanceResponseFailure (string error)
{
	Debug.Log ("C#: HandleGetCurrencyBalanceResponseFailure: " + error);
}

public void HandleSpendCurrencyResponse (string currencyName, int balance)
{
	Debug.Log ("C#: HandleSpendCurrencyResponse: currencyName: " + currencyName + ", balance: " + balance);
}

public void HandleSpendCurrencyResponseFailure (string error)
{
	Debug.Log ("C#: HandleSpendCurrencyResponseFailure: " + error);
}

public void HandleEarnedCurrency (string currencyName, int amount)
{
	Debug.Log ("C#: HandleEarnedCurrency: currencyName: " + currencyName + ", amount: " + amount);

	Tapjoy.ShowDefaultEarnedCurrencyAlert ();
}
I hope you find this post very helpful while Tapjoy Implementing in Unity. Let me know in comment if you have any questions regarding unity. I will reply you ASAP.
Got an idea of unity game development what are you still waiting for? Contact us now and see the idea live soon. Our company has been named as one of the best game development company in India.

I am 2D Game developer and iOS Developer with an aspiration of learning new technology and creating a bright future in Information Technology.
