Be patient..... we are fetching your source code.
Objective
The main objective of this blog post is to describe the basics of UISlider and its use to add slider related functionalities in your application.
Introduction to UISlider:
Slider control is a simple horizontal bar with a slider button. By using it you can adjust or set some values. It is used to add functionalities like volume increase/decrease, adjust brightness, zoom in/out and so on.
UISlider class is used to implement the methods related to slider and this class is the part of UIKit Framework, which you will use to build your application.
Let’s create a simple app through which you can change the volume of your device music library.
Step 1 Create Xcode Project
First create a new xCode project and select single view application and name it as UISliderDemo.
Step 2 Design UI
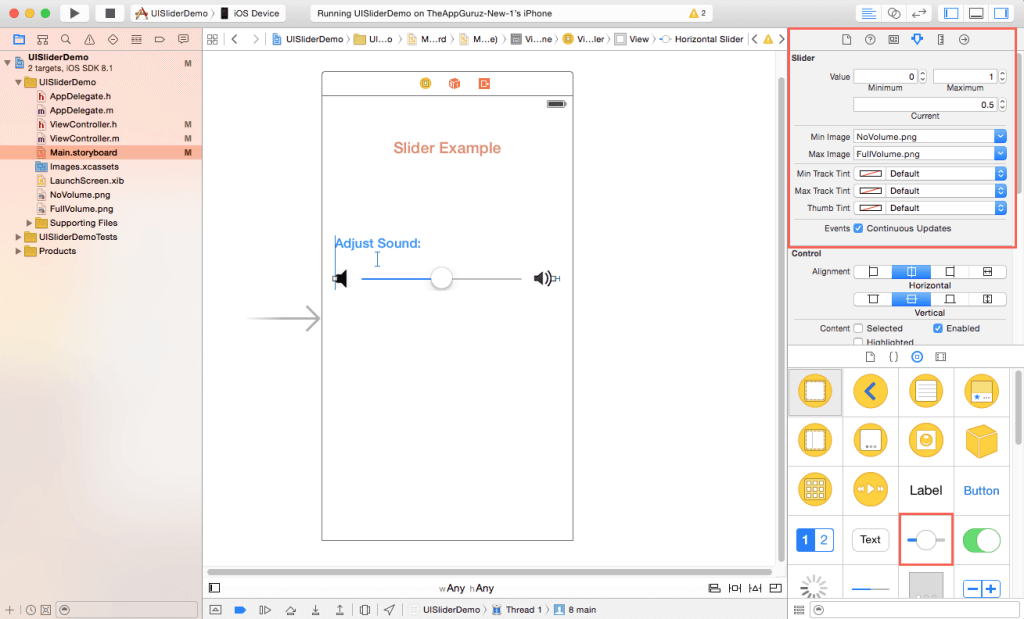
Now go to the Main.Storyboard and create user interface like this:
You can find slider control in the right bottom panel.

From the attributes inspector you can set the min and max value for slider and set the image icons to show the min and max value edges.
Step 3 Create IBAction & IBOutlete
Now make an IBOutlet and IBAction for the slider and name it as ‘slider’ and ‘sliderAction’ respectively.
@property (weak, nonatomic) IBOutlet UISlider *slider;
- (IBAction)sliderAction:(id)sender;
Step 4 Import MediaPlayer file
To access the current volume of your device, you have to import this header file in your viewController.h.
#import <MediaPlayer/MediaPlayer.h>
Step 5 Handle Slider Action
Use an MPMusicPlayerController class object to set the sound for your device music library. Now change the current volume by implementing this code in sliderAction method:
- (IBAction)sliderAction:(id)sender
{
   [[MPMusicPlayerController applicationMusicPlayer] setVolume:self.slider.value];
}
Here, applicationMusicPlayer is a class method, which returns the object of MPMusicPlayerController.
Definition: + (MPMusicPlayerController *) applicationMusicPlayer
After we get the object of MPMusicPlayerController, we can set the volume using volume property of that MPMusicPlayerController object.
Step 6 Set MusicPlayerController
To set the default position of slider button, we will get the device’s current sound value when our application will load in the device. To implement this, write below code in viewDidLoad method:
- (void)viewDidLoad {
[super viewDidLoad];
slider.value=[[MPMusicPlayerController applicationMusicPlayer] volume];
}
Step 7 Run & final Output
Now run your application. To test it, first play a song from your device music library and now try to adjust the volume from your application using slider.
I hope you find this blog is very helpful while working with UISlider in iOS to Change the Volume. Let me know in comment if you have any questions regarding iOS. I will reply you ASAP.
Got an Idea of iPhone App Development? What are you still waiting for? Contact us now and see the Idea live soon. Our company has been named as one of the best iPhone App Development Company in India.

I am an iOS developer and I like to develop creative apps. I love to update my programming knowledge with new concepts and features which are continuously added in iOS.
Vertical TextView With Shadow Effect
Pixel Tile Set
