Be patient..... we are fetching your source code.
Objective
Main objective of this tutorial is to explain how to set custom font to Textview, Button etc. in Android.
By default we can set only normal, sans, serif or monospace font to any control from the layout file using typeface property. But if we want to set any other font than these default, We can use setTypeface() method of control.

Following are the steps to set font using setTypeface() method:
Step 1 Put .ttf file in assets folder.
Put your font's ttf file in assets folder of your project.
Step 2 activity_main.xml file
Create layout file activity_main.xml as following:
<LinearLayout xmlns:android="http://schemas.android.com/apk/res/android"
    xmlns:tools="http://schemas.android.com/tools"
    android:layout_width="match_parent"
    android:layout_height="match_parent"
    android:gravity="center|center_horizontal"
    android:orientation="vertical" >

    <TextView
        android:id="@+id/textView1"
        android:layout_width="wrap_content"
        android:layout_height="wrap_content"
        android:padding="10dp"
        android:text="TextView"
        android:textSize="18sp" />

</LinearLayout>
Step 3 Create Typeface
Create Typeface Object and set this typeface to your view as following:
@Override
protected void onCreate(Bundle savedInstanceState) {
super.onCreate(savedInstanceState);
setContentView(R.layout.activity_main);
Typeface typeface = Typeface.createFromAsset(getAssets(),
"JennaSue.ttf");
((TextView) findViewById(R.id.textView1)).setTypeface(typeface);

}
Step 4 CustomView class
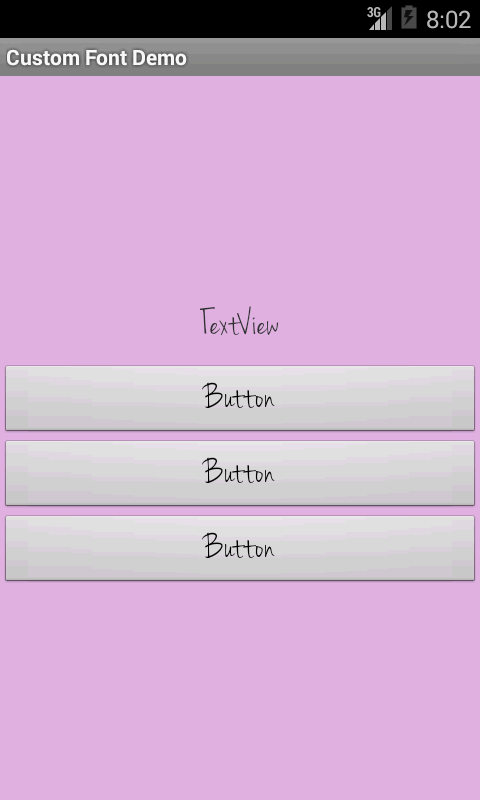
If You want your custom font in every control ,for example you have 5 buttons and you want to set same font to these buttons then Create CustomView that Set Custom Typeface rather than to call setTypeface() method for every buttons.
Following are the steps to set custom typeface by creating CustomView class:
4.1 Create CustomButtonView class
Create CustomButtonView class as following in your project:
public class CustomButtonView extends Button {
private static final String asset = "JennaSue.ttf";

public CustomButtonView(Context context) {
super(context);
}

public CustomButtonView(Context context, AttributeSet attrs) {
super(context, attrs);
setCustomFont(context, asset);
}

public CustomButtonView(Context context, AttributeSet attrs, int defStyle) {
super(context, attrs, defStyle);
setCustomFont(context, asset);
}

public boolean setCustomFont(Context ctx, String asset) {

setTypeface(TypeFace.get(ctx, asset));
return true;
}

}
class TypeFace {
private static final String TAG = "Typefaces";

private static final Hashtable<string, typeface=""> cache = new Hashtable<string, typeface="">();

public static Typeface get(Context c, String assetPath) {
synchronized (cache) {
if (!cache.containsKey(assetPath)) {
try {
Typeface t = Typeface.createFromAsset(c.getAssets(),
assetPath);
cache.put(assetPath, t);
} catch (Exception e) {
Log.e(TAG, "Could not get typeface '" + assetPath
+ "' because " + e.getMessage());
return null;
}
}
return cache.get(assetPath);
}
}
}
For more about Typeface please refer following link:
For more about setTypeface() method please refer following link:
4.2 Layout file
Now when you create your layout file and you want to add button with your custom font, specify CustomButtonView instend of button as following:
<LinearLayout xmlns:android="http://schemas.android.com/apk/res/android"
    xmlns:tools="http://schemas.android.com/tools"
    android:layout_width="match_parent"
    android:layout_height="match_parent"
    android:background="#E1B4E3"
    android:gravity="center|center_horizontal"
    android:orientation="vertical" >

    <TextView
        android:id="@+id/textView1"
        android:layout_width="wrap_content"
        android:layout_height="wrap_content"
        android:padding="10dp"
        android:text="TextView"
        android:textColorHint="@android:color/black"
        android:textSize="25sp" />

    <com.tagworld.customfontdemo.CustomButtonView
        android:id="@+id/button1"
        android:layout_width="match_parent"
        android:layout_height="wrap_content"
        android:text="Button"
        android:textSize="25sp" />

    <com.tagworld.customfontdemo.CustomButtonView
        android:id="@+id/button2"
        android:layout_width="match_parent"
        android:layout_height="wrap_content"
        android:text="Button"
        android:textSize="25sp" />

    <com.tagworld.customfontdemo.CustomButtonView
        android:id="@+id/button3"
        android:layout_width="match_parent"
        android:layout_height="wrap_content"
        android:text="Button"
        android:textSize="25sp" />

</LinearLayout>
If you have any query related to how to use custom font in Android please comment below we will try to solve it out.
Got an Idea of Android App Development? What are you still waiting for? Contact us now and see the Idea live soon. Our company has been named as one of the best Android App Development Company in India.

I am android developer, and do development not because to get paid or get adulation by the public, but because it is fun to program. I have been working in this field since one and half year.
How To Keep the Android Owners Enthralled
iOS - Text Overlay on Image
