Be patient..... we are fetching your source code.
Objective
The main objective of Swift Sqlite Tutorial is to help you understand how to Insert, Update, Delete Records in SQLite Database in Swift.
Before I start coding the app, I would like to give you some knowledge about database we are going to use – SQLite
WHAT IS SQLITE?
Four things to remember:
- SQLite is Relational Database Management System (RDBMS).
- SQLite is also known as Embedded because it is available as library that is linked with our application. There is no stand-alone server running in the background. You have to handle all the operations within the app through various functions provided by SQLite library.
- SQLite is written in C programming language. So if we want to use SQLite in our application we might have to work with complicated C functions, data types and pointers. (But here, in this post I am going through easier approach; I am using already available SQLite wrapper [FMDB] interface between SQLite database and my swift application).
- Data available from SQLite database can be accessed using Structured Query Language, which is known as SQL (pronounced as Sequel). SQL is basic language used by most of the RDBMS.
If you would like to learn more about SQLite, please refer the following link:
Lets get started with our app.
Step 1 Create Layouts
1.1 Create New Project for Sqlite Swift Database
Create new Xcode swift project named DbDemoExampleSwift. If you don’t know basic steps to create project in xCode, please refer following link:
In our project, we would be manipulating (Insert/Update/Delete) Students Data (Name & Marks to keep the things simple).
1.2 Create Layouts
Now, Lets get started with the layout. The layout in figure-1 will be shown when application is launched. You can simply drag and drop controls from object library to view controller available in storyboard.
Following objects are used to design layout:
- UILabel
- UIButton
- UITableView
- UITextField
If you would like to learn more about designing user interface, please refer the following link:
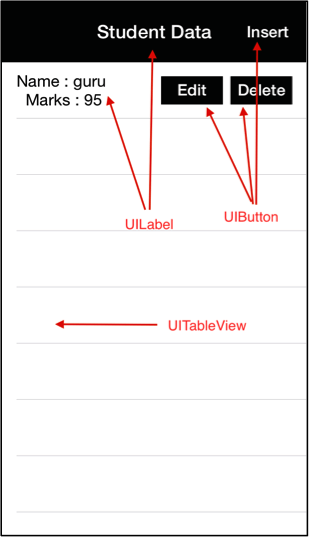
HomeScreenViewController.swift (Figure - 1)
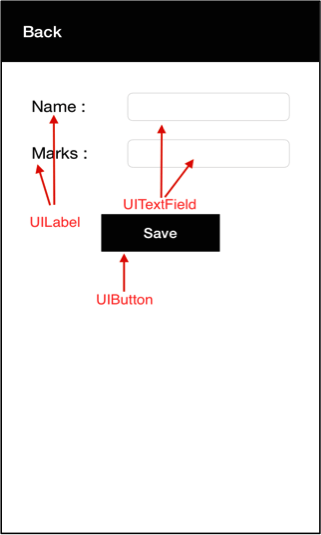
InsertRecordViewController.swift (Figure - 2)
1.3 Set up Classes
Once you are done with the layouts, you have to create swift files, which correspond to particular layout.
a. In our case we are creating two swift files named:
| HomeScreenViewController.swift | Handles showing students data |
| InsertRecordViewController.swift | Handles inserting students data |
b. Now select View Controller as shown in following figure
- Go to Identity inspector (tab from top right side). Set Class as HomeScreenViewController.
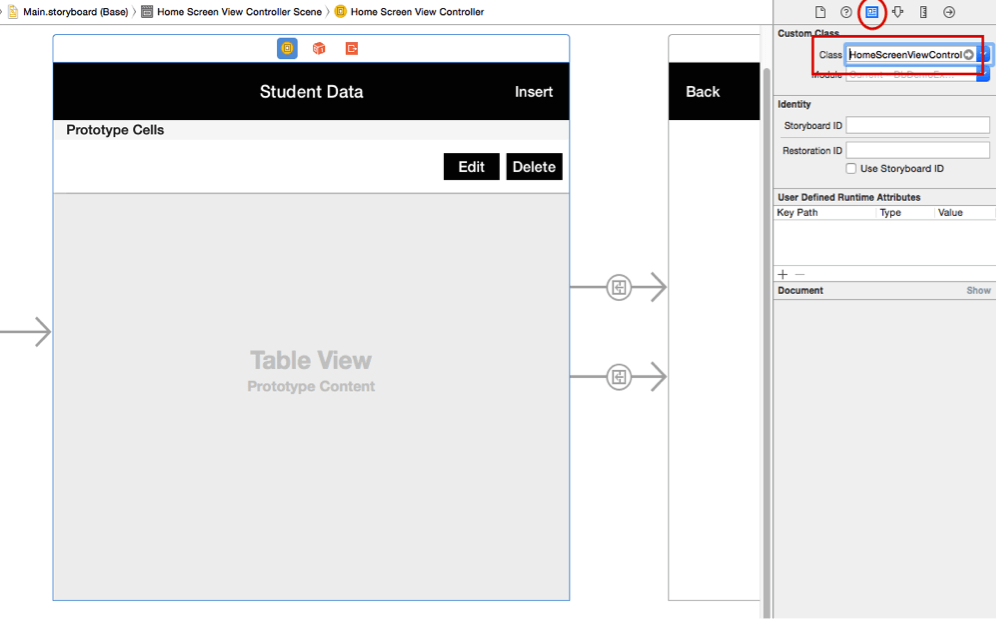
c. Now select view controller showed in [figure -2]
- Go to Identity inspector Set Class as InsertRecordViewController.
d. Create custom UITableViewCell Class
- Create StudentCell class from UITableViewCell
- Select UITableViewCell from storyboard
- Go to Identity inspector
- Set Class as StudentCell
e. Create segue from storyboard
| editSegue | HomeScreenViewController to InsertRecordViewController |
| insertSegue | Insert Button to InsertRecordViewController |
If you know how to do this, you can skip this step and directly go to Step-2.
1.4 Connect Properties & Actions
Now, create property and action as per following.
a. HomeScreenViewController.swift (UIViewController)
@IBOutlet weak var tbStudentData: UITableView!
@IBAction func btnDeleteClicked(sender: AnyObject) {}
@IBAction func btnEditClicked(sender: AnyObject) {}
b. InsertRecordViewController.swift (UIViewController)
@IBOutlet weak var txtName: UITextField!
@IBOutlet weak var txtMarks: UITextField!
@IBAction func btnBackClicked(sender: AnyObject) {}
@IBAction func btnSaveClicked(sender: AnyObject) {}
c. StudentCell.swift (UITableViewCell)
@IBOutlet weak var lblContent: UILabel! // for displaying student name and marks
@IBOutlet weak var btnEdit: UIButton!
@IBOutlet weak var btnDelete: UIButton!
If you would like to learn more about property and action, please refer given link:
- https://developer.apple.com/library/ios/documentation/General/Conceptual/Devpedia-CocoaApp/TargetAction.html
- https://developer.apple.com/library/ios/documentation/General/Conceptual/Devpedia-CocoaApp/Outlet.html
Step 2 Integrate SQLite in our project
2.1 Integrate FMDB (Third Party Library)
In our Swift Sqlite tutorial, we would be using FMDB in order to perform all the database operations.
WHAT IS FMDB?
FMDB stands for Flying Meat Database. This project aims to be a fully featured wrapper for SQLite. You can clone the FMDB repository from the given link.
To do this, Download FMDB from the above URL. Then Unzip downloaded file copy to src >> fmdb folder of your project. When we are implementing database using SQLite and FMDB wrapper,
Most commonly used classes are:
| FMDatabase | Used to represent single SQLite Database. |
| FMResultSet | Used to hold result of SQL query on FMDatabase object. |
If you would like to learn more about FMDB, please refer the following link:
2.2 Link SQLite library

SQLite library is used to load Objective-C libraries when we add the database. If you ignore this, you will get number of errors at compile time regarding SQLite.
To add library please follow these:
- Select your project from left panel of XCode.
- Click the main target in the middle panel.
- Select the Build Phases from available tabs.
- Expand the arrow next to Link Binary With Libraries.
- Click the + button
- Search for libsqlite3.0.dylib and add it.
2.3 Solving ARC Issue
FMDatabase files do not support ARC and hence we have to set complier flag for all FMDatabase files. We use -fno-objc-arc flag to disable ARC from FMDatabase Files.
Note
We have to set flag to FMDatabse files only and not to any other files.
- Select your project from left panel of XCode.
- Click the main target in the middle panel.
- Select the Build Phases from available tabs.
- Expand the arrow next to Compile Souces
- Add compiler flag -fno-objc-arc to FMDB library files as following.

2.4 Add Bridging Header (Objective-C to Swift Wrapper)
FMDatabase is in Objective C so if you want to use it in your swift project you need a bridging header file in your project.
a. Go To File >> New >> file (select header file)
b. Use the [ProjectName]-Bridging-Header.h naming convention.
c. Go to Build Settings tab >> Swift Compiler section
1) Install Objective-C Compatibility Header = Yes
2) Objective-C bridging Header = [name of bridging header file]

If you would like to learn more about Objective C bridging header, please refer the following link:
2.5 Create SQLite Database
To create database you can use SQLite Manager Add-on of the Firefox browser. Download it from the given link.
Download Link: https://addons.mozilla.org/en-US/firefox/addon/sqlite-manager/
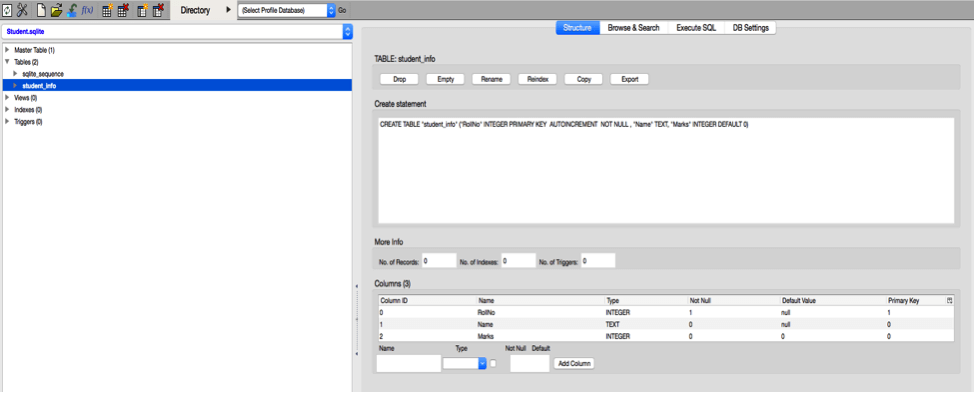
- Open Firefox browser >> Tools >> SQLite Manager.
- Create Database named Student.sqlite
- Insert table student_info (RollNo(int[auto increment]), Name (text) , Marks (int) ).
- Copy database to project repository (./DbDemoExampleSwift/Model).
2.5.1 Copy Database into application’s document directory
Why?
As mentioned in 2.5 step, Database is already copied to the project repository. Database file is now included in your application but it cant be used to store data yet.
Hence, we need to copy database file to the document folder of our application on real device. Copy database file to application’s document directory by calling below method in applicationDidFinishLaunching() method of AppDelegate, pass database name as argument in copyFile() method.
func application(application: UIApplication, didFinishLaunchingWithOptions launchOptions: [NSObject : AnyObject]?) -> Bool
{
        Util.copyFile("Student.sqlite")
        return true
}
2.5.2 Util Class
Lets create NSObject class called as Utility class, which contains common and often reused functions as following.
a. Use getFilepath() to get path for specified file.
class func getPath(fileName: String) -> String {

        let documentsURL = NSFileManager.defaultManager().URLsForDirectory(.DocumentDirectory, inDomains: .UserDomainMask)[0]
        let fileURL = documentsURL.URLByAppendingPathComponent(fileName)

        return fileURL.path!
    }
NSSearchPathForDirectoriesInDomains returns the file path. It takes argument as follows:
| NSSearchPathDirectory | It specifies a location for various directories. |
| NSSearchPathDomainMask | It specifies base location for NSSearchPathDirectory type. |
| expandedTilde | If set to YES then tildes are expanded |
If you would like to learn more about expandedTilde, please refer the following link:
- https://developer.apple.com/library/mac/documentation/Cocoa/Reference/Foundation/Miscellaneous/Foundation_Functions/#//apple_ref/c/func/NSSearchPathForDirectoriesInDomains
- https://developer.apple.com/library/mac/documentation/Cocoa/Reference/Foundation/Classes/NSString_Class/index.html#//apple_ref/occ/instp/NSString/stringByExpandingTildeInPath
If you would like to learn more about constants and its value for NSSearchPathForDirectoriesInDomains, please refer the following link:
b. Use copyFile() to copy file from source to destination.
class func copyFile(fileName: NSString) {
        let dbPath: String = getPath(fileName as String)
        let fileManager = NSFileManager.defaultManager()
        if !fileManager.fileExistsAtPath(dbPath) {

            let documentsURL = NSBundle.mainBundle().resourceURL
            let fromPath = documentsURL!.URLByAppendingPathComponent(fileName as String)

            var error : NSError?
            do {
                try fileManager.copyItemAtPath(fromPath.path!, toPath: dbPath)
            } catch let error1 as NSError {
                error = error1
            }
            let alert: UIAlertView = UIAlertView()
            if (error != nil) {
                alert.title = "Error Occured"
                alert.message = error?.localizedDescription
            } else {
                alert.title = "Successfully Copy"
                alert.message = "Your database copy successfully"
            }
            alert.delegate = nil
            alert.addButtonWithTitle("Ok")
            alert.show()
        }
    }
You can use NSFileManager class on File and directories for following operations Locate, Create, Copy, Move. It provides copyItemAtPath() function to copy files from source to destination.
If you would like to learn more about NSFileManager class, please refer the following link:
c. Use InvokeAlert() function, which is used to show alert dialog with message given by user.
class func invokeAlertMethod(strTitle: NSString, strBody: NSString, delegate: AnyObject?)
{
        var alert: UIAlertView = UIAlertView()
        alert.message = strBody as String
        alert.title = strTitle as String
        alert.delegate = delegate
        alert.addButtonWithTitle("Ok")
        alert.show()
    }
This function simply create alert dialog with single button by providing its title, message and delegate.
You can learn more about UIAlertView and its type from the given link:
Step 3 Insert/Update/Delete Records
3.1 Create Model of database
What is Model?
Model is used to handle all the fields of a single table from database.
Why you should use model class?
- You don’t need to remember name of the fields of a table since all the operation would be performed by creating model of data.
- If schema of the table is modified, you need to update model class only.
- Creating model is a good programming practice and provides ease of access.
I have created StudentInfo.swift file of NSObject type as model class to fetch the data from StudentInfo table of my database.
import UIKit

class StudentInfo: NSObject
 {
    var RollNo: String = String()
    var Name: String = String()
    var Marks: String = String()
}
3.1.1 Create Model Manager (Singleton class)
What is Singleton Class?
Singleton is a special type of class, in which only one instance of class exists for current process. Instance is shared across the entire application. It is useful when one or more ViewController uses the same instance throughout application.
In our case, model manager uses object of Model class to perform various operations on database. It basically handles the object of model so we called it as Model Manager.
Why we are using it in our application?
Here we are creating singleton class to achieve following:
- Database instance remain globally persistent throughout the application.
- Thread safe
- Database should remain in consistent state all the time since our application can get interrupted.
Create singleton class ModelManager.
Define constant named sharedInstance of type ModelManager.
let sharedInstance = ModelManager()
Declare class method named getInstance() and initialize database property of class.
// This code is called at most once
class func getInstance() -> ModelManager
{
        if(sharedInstance.database == nil)
        {
            sharedInstance.database = FMDatabase(path: Util.getPath("Student.sqlite"))
        }
        return sharedInstance
 }
3.1.2 Querying Database through Model Manager
Querying database basically includes following steps:
- Open database connection.
- Call method to execute SQL query.
executeUpdate:withArgumentsInArray: (SQL Insert/update/delete query and its parameters as argument): This method executes a single SQL update statement, SQL statements that does not return any results, such as INSERT, UPDATE and DELETE.
executeQuery: (SQL select query and its parameters as argument.): This method executes SQL select statements and returns an FMResultSet object if successful, and nil for failure. FMResultSet returned by this method will be added to NSMUtableArray and getAllStudentData() method returns whole array. - Handle the result.
- Close database connection.
3.2 Insert Records
func addStudentData(studentInfo: StudentInfo) -> Bool
 {
        sharedInstance.database!.open()
        let isInserted = sharedInstance.database!.executeUpdate("INSERT INTO student_info (Name, Marks) VALUES (?, ?)", withArgumentsInArray: [studentInfo.Name, studentInfo.Marks])
        sharedInstance.database!.close()
        return isInserted
}
>> Add record to StudentInfo:
Pass StudenInfo(Name, Marks) object. (Don’t need to pass RollNo because it is auto incremented field).
@IBAction func btnSaveClicked(sender: AnyObject)
    {
        let studentInfo: StudentInfo = StudentInfo()
                studentInfo.Name = txtName.text!
                studentInfo.Marks = txtMarks.text!
                let isInserted = ModelManager.getInstance().addStudentData(studentInfo)
                if isInserted {
                    Util.invokeAlertMethod("", strBody: "Record Inserted successfully.", delegate: nil)
                } else {
                    Util.invokeAlertMethod("", strBody: "Error in inserting record.", delegate: nil)
                }
    }
3.2.1 View Records
func getAllStudentData() -> NSMutableArray {
        sharedInstance.database!.open()
        let resultSet: FMResultSet! = sharedInstance.database!.executeQuery("SELECT * FROM student_info", withArgumentsInArray: nil)
        let marrStudentInfo : NSMutableArray = NSMutableArray()
        if (resultSet != nil) {
            while resultSet.next() {
                let studentInfo : StudentInfo = StudentInfo()
                studentInfo.RollNo = resultSet.stringForColumn("RollNo")
                studentInfo.Name = resultSet.stringForColumn("Name")
                studentInfo.Marks = resultSet.stringForColumn("Marks")
                marrStudentInfo.addObject(studentInfo)
            }
        }
        sharedInstance.database!.close()
        return marrStudentInfo
    }
Display records of StudentInfo:
Fetch data from student_info table
func getStudentData()
    {
        marrStudentData = NSMutableArray()
        marrStudentData = ModelManager.instance.getAllStudentData()
        tbStudentData.reloadData()
    }
You can call above method from viewWillAppear().
To display records in UITableView
func tableView(tableView: UITableView, numberOfRowsInSection section: Int) -> Int {
        return marrStudentData.count
    }

    func tableView(tableView: UITableView, cellForRowAtIndexPath indexPath: NSIndexPath) -> UITableViewCell {
        let cell:StudentCell = tableView.dequeueReusableCellWithIdentifier("cell") as! StudentCell
        let student:StudentInfo = marrStudentData.objectAtIndex(indexPath.row) as! StudentInfo
        cell.lblContent.text = "Name : \(student.Name)  \n  Marks : \(student.Marks)"
        cell.btnDelete.tag = indexPath.row
        cell.btnEdit.tag = indexPath.row
        return cell
    }
3.3 Update Records
func updateStudentData(studentInfo: StudentInfo) -> Bool {
        sharedInstance.database!.open()
        let isUpdated = sharedInstance.database!.executeUpdate("UPDATE student_info SET Name=?, Marks=? WHERE RollNo=?", withArgumentsInArray: [studentInfo.Name, studentInfo.Marks, studentInfo.RollNo])
        sharedInstance.database!.close()
        return isUpdated
    }
Update record of StudentInfo:
Bool flag is set to perform save or update operation when save button is clicked. Edit button is available for each record. So, when you want to edit specific record you have to set unique value to button.
cell.btnEdit.tag = indexPath.row

HomeScreenViewController.h

@IBAction func btnEditClicked(sender: AnyObject)
{
        self.performSegueWithIdentifier("editSegue", sender: sender)
}

override func prepareForSegue(segue: UIStoryboardSegue, sender: AnyObject?) {
        if(segue.identifier == "editSegue")
        {
            let btnEdit : UIButton = sender as! UIButton
            let selectedIndex : Int = btnEdit.tag
            let viewController : InsertRecordViewController = segue.destinationViewController as! InsertRecordViewController
            viewController.isEdit = true
            viewController.studentData = marrStudentData.objectAtIndex(selectedIndex) as! StudentInfo
        }
    }

InsertRecordViewController.h

@IBAction func btnSaveClicked(sender: AnyObject)
    {
        let studentInfo: StudentInfo = StudentInfo()
                studentInfo.RollNo = studentData.RollNo
                studentInfo.Name = txtName.text!
                studentInfo.Marks = txtMarks.text!
                let isUpdated = ModelManager.getInstance().updateStudentData(studentInfo)
                if isUpdated {
                    Util.invokeAlertMethod("", strBody: "Record updated successfully.", delegate: nil)
                } else {
                    Util.invokeAlertMethod("", strBody: "Error in updating record.", delegate: nil)
                }
    }
3.4 Delete Records
func deleteStudentData(studentInfo: StudentInfo) -> Bool {
        sharedInstance.database!.open()
        let isDeleted = sharedInstance.database!.executeUpdate("DELETE FROM student_info WHERE RollNo=?", withArgumentsInArray: [studentInfo.RollNo])
        sharedInstance.database!.close()
        return isDeleted
    }
Delete record of StudentInfo:
Delete button is available for each record. So, when you want to delete specific record you have to set unique value to button.
cell.btnDelete.tag = indexPath.row
To Delete Particular Record:
@IBAction func btnDeleteClicked(sender: AnyObject) {
        let btnDelete : UIButton = sender as! UIButton
        let selectedIndex : Int = btnDelete.tag
        let studentInfo: StudentInfo = marrStudentData.objectAtIndex(selectedIndex) as! StudentInfo
        let isDeleted = ModelManager.getInstance().deleteStudentData(studentInfo)
        if isDeleted {
            Util.invokeAlertMethod("", strBody: "Record deleted successfully.", delegate: nil)
        } else {
            Util.invokeAlertMethod("", strBody: "Error in deleting record.", delegate: nil)
        }
        self.getStudentData()
    }
I hope you found this blog post helpful while Using SQLite Database in Swift. Let me know if you have any questions or concerns regarding iOS, please put a comment here and we will get back to you ASAP.
Got an Idea of iPhone App Development? What are you still waiting for? Contact us now and see the Idea live soon. Our company has been named as one of the best iPhone App Development Company in India.

I am iOS developer, as a developer my basic goal is continue to learn and improve my development skills , to make application more user friendly.
Create Custom Keyboard for iOS8
